Installation Study
In order to ensure correct operation of the CANlink® mobile hardware when it is installed on the machine under real setup and environmental conditions, Proemion recommends performing an installation study..
The installation study ideally consists of two phases:
| # | Phase | Description |
|---|---|---|
| 1 | Verification | In the initial phase of the installation study, it is essential to verify the setup requirements in regards to the specification of the CANlink® mobile. |
| 2 | Validation | During the validation phase, the device is tested under real operating conditions and its suitability for the planned application is assessed. Several iterations and corrective actions may be required at this stage. |
Verification
The machine manufacturer and system integrator needs to clarify the issues according to the checklist below:
| # | Checkpoint |
|---|---|
| 1 | Specify the setup and environmental conditions of the planned application at the final destination of the machine. |
| 2 | Ensure that the setup conditions within the machine and the environmental conditions meet the specification of the CANlink® mobile. |
| 3 | Make sure that the CANlink® mobile can be installed according to the recommendation in the chapters Mount the Device including Cables. |
| 4 | Check that the antenna can be installed and aligned as recommended in chapters Cellular and GNSS Antenna and Antenna Positioning. |
| 5 | Check that the recommended settings from chapter Power Management can be realized with the machine setup. |
Validation
Once the Verification of the setup and environmental conditions regarding the specification of the CANlink® mobile was completed, it is recommended to proceed with the validation. At this stage of the system integration, the suitability of the CANlink® mobile for the above-mentioned criteria under real setup conditions must be determined. It is also advisable to evaluate the setup already in the prototype phase concerning power management, remote update ability, data consumption, remote and signal strength.
Prerequisites
Before the validation can be started, the machine manufacturer and system integrator must meet the following requirements:
| # | Prerequisite |
|---|---|
| 1 | The machine and the programming of its control units correspond to the final series status. |
| 2 | The machine is available for validation under real operating conditions for at least one week. |
| 3 | The CANlink® mobile is installed according to Mount the Device. |
| 4 | The CANlink® mobile is wired according to Cables and Power Management sections. |
| 5 | The CAN baudrate(s) of the CANlink® mobile are set correctly. The default CAN baudrate is 250 kbit/s. Please make sure that the CAN baud rate (s) at the machine are matching the CAN baud rates of the individual CAN interfaces of the CANlink® mobile. |
| 6 | The antenna is installed and aligned according to Cellular and GNSS Antenna](connectors.md) and Antenna Positioning. |
| 7 | All cables, antennas, hoses, etc. must be laid and connected. |
| 8 | All housing parts of the machine must be installed according to the final series status. |
| 9 | The CANlink® mobile was activated according to Provisioning / Go Live and is available with the status live within your DataPortal account. |
For more information regarding the initial setup, also refer to the document CANlink mobile 3600 Quick Start Guide.
Perform Installation Study
In case that the necessary prerequisites are fulfilled, it is recommended to perform an installation study under real setup and environmental conditions.
-
Login with your DataPortal user.
-
Check the firmware status of the CANlink® mobile according to chapter Firmware Management at the DataPortal User Manual. If necessary, update the firmware of the CANlink® mobile to the latest official firmware version.
Note
Whenever a remote update is done, it is recommended to follow the instruction according to the Safe Remote Updates Guideline.
-
Use the following PDC template containing the necessary elements: PDC Template. For a reference of the metrics to be used, go to the Download Center under:
02_DataPlatform Documentation > 03_Data Transfer and Interpretation > Proemion_DemoConfig.pdc. Assign the PDC to the corresponding machine model which needs to be evaluated. See also chapter PDC Management in the DataPortal User Manual. -
Download the demo configuration for the used CANlink® mobile from the Download Center under:
01_Proemion > 01_CANlink mobile 3600 > 02_Configuration > 01_StandardNote
The PROEMION_DemoConfig.pdc and clm36xx_Proemion_DemoConfig.DOD configuration files are designed to transfer and parse a few selected standard metrics from the J1939 standard, as well as values from the internal sensors. In the installation study, in particular the acceleration values and the device temperature are taken into account.
Note
In case that the machine data is not in accordance with the J1939 standard, add the device parameters to the customized device configuration and PDC.
Please get in contact with the Proemion Support for further assistance with the configuration of the test setup. -
Open the clm36xx_Proemion_DemoConfig.DOD with the Proemion Configurator software. Please also refer to Configuring the Device.
-
Ensure that the configuration contains the operations Calculate_Shock_Max and Calculate_Temperature_Max.
Demo Configuration for Install Study
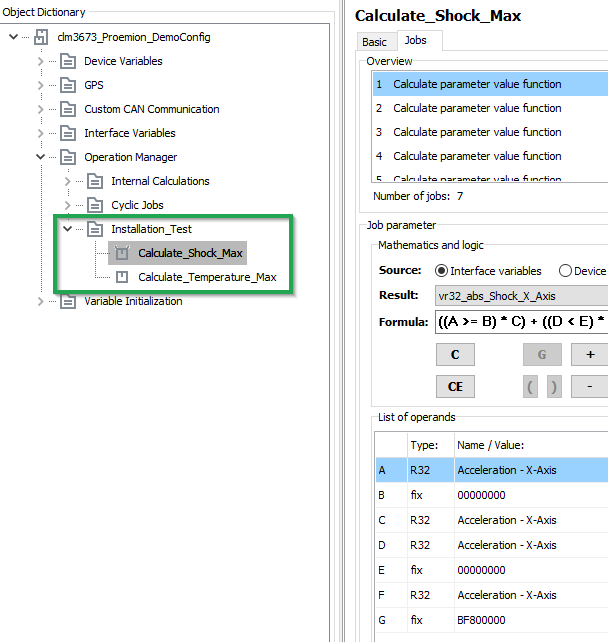
Figure 1: DemoConfigInstallStudy1 Note
If the required demo configuration for your specific variant of the CANlink® mobile is not available at the Download Center yet, please get in contact with the Proemion Support.
-
Adapt the configuration in regard to CAN baudrate and Power Management.
Note
It is essential for a successful installation study and optimized data consumption, to have already a clarified concept about the required Power Management settings and the connected CAN bus. Ideally, the terminal 15 monitoring is established and there is no CAN traffic when the ignition key is off.
-
Update the device configuration according to chapter Configuration update via DataPlatform.
Note
Whenever a remote update is done, it is recommended to follow the instructions according to the Safe Remote Updates Guideline.
-
Check the status of the communication unit. See chapter Communication Details at the DataPortal User Manual manual.
Communication Unit Update History
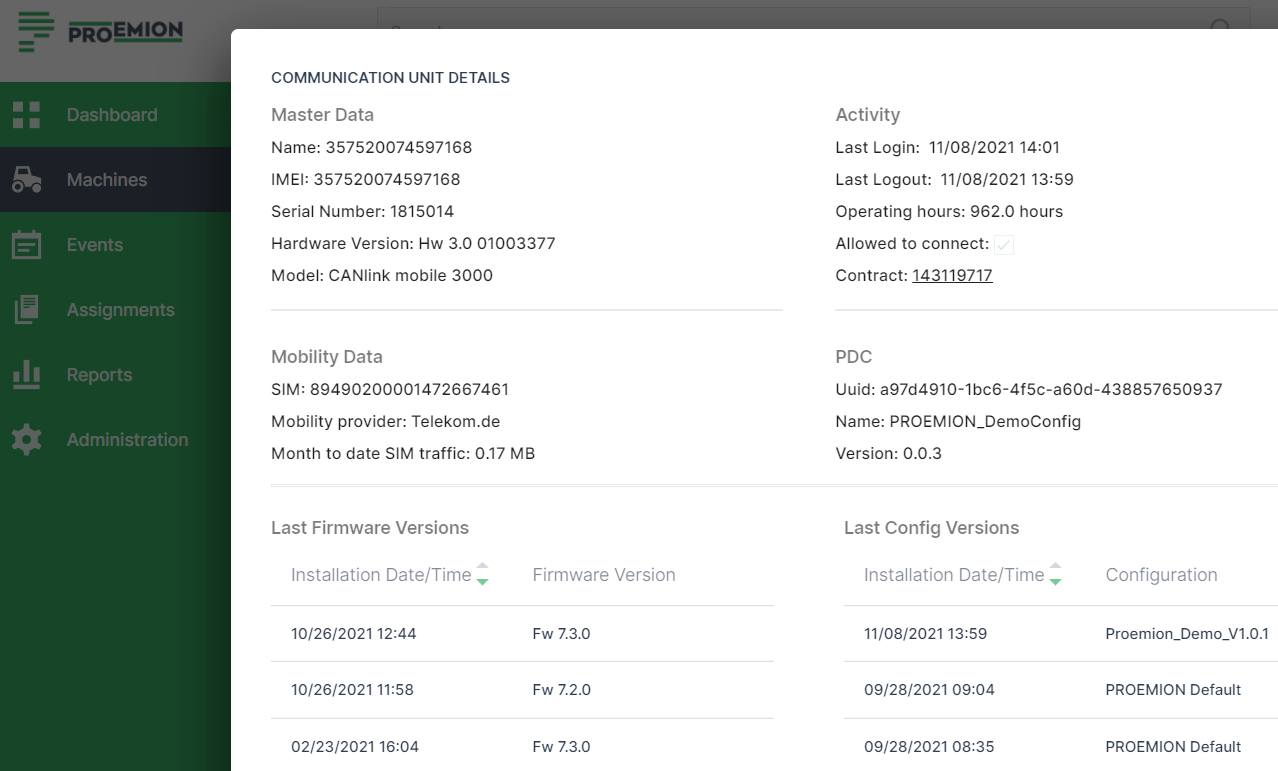
Figure 2: {{ eightin }} -
Once the configuration files are installed and assigned, start with the install study under real conditions of use and monitor the parameters as mentioned in the table
# Check 1 Ensure that the wakeup and shutdown behavior is correct and in accordance with recommended Power Management settings. 2 Ensure that the device temperature stays within the allowed range during real machine operation. 3 Monitor the maximum shock values. Perform corrective action if it turns out that there is too much vibration and shock at the installed CANlink® mobile. 4 Monitor the mobile network signal quality. Optimize the antenna position if necessary. 5 Ensure that the logged metrics from the machine are displayed correctly. Check the CAN bus connection if necessary. 6 During the system integration also monitor the current mobile network mode. 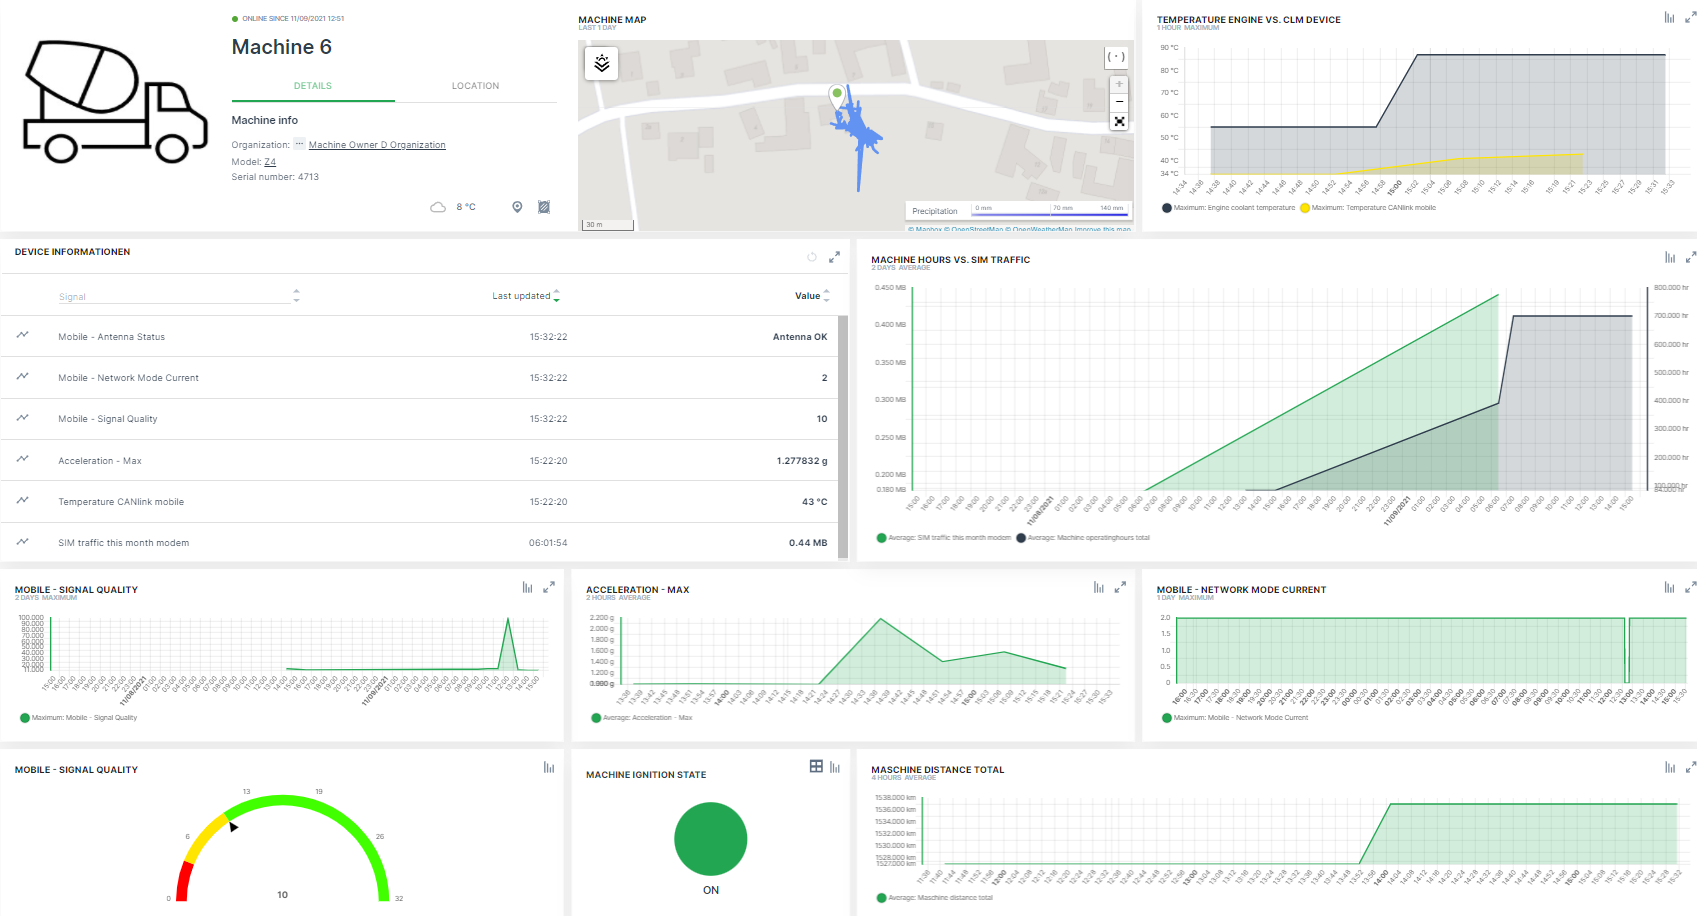
Figure 3: Dashboard for Monitoring Note
Please get in contact with support@proemion.com, if further assistance with adding the necessary device parameters to the logging configuration and default PDC file is required.
-
Once the install study with the default configuration is completed, install and assign your customized configuration files (
.dodand.pdc). -
With the customized configuration files installed, check again the power management settings. Make sure that the device is switched on and off by the terminal 15.
-
Ensure that all configured signals are complete and transmitted correctly.
-
Check the SIM traffic in relation to the machine operation hours and transmitted signals. Make sure that the consumed data volume under real conditions of use corresponds to the selected hosting contract. For information on the availability of the Proemion tariffs for each country, see Cellular Dataplan.
-
Carry out continuous visual checks on the hardware.
-
When the installation study is complete, ensure that CANlink® mobile has not been adversely affected in the tested mounting position.
# Check 1 Ensure that the device was not harmed by water ingress during the installation study. 2 Ensure that the housing material of device was not harmed by chemicals during the installation study. 3 Ensure that the device and its cable management was not harmed by maximum shock values. -
In the event that the installation study has revealed any weak points, take appropriate corrective measures and repeat the installation study.
-
Perform the configuration update with the
*.dodfor the final application. Follow the instructions from the Safe Remote Updates Guideline. -
When the installation investigation has been successfully completed, adjust your device configuration PDC Management and Dashboard Management for the final application. The recording of device temperature, shock values, signal quality, etc. is not required for the customer application.