Remedies
| Problem | Possible cause |
|---|---|
| Device does not function. | Check the power supply via the main plug connector (terminal_30, terminal_31, terminal_15). |
| Device does not receive CAN messages | Check the CAN connection and the configuration of the CAN messages. Check whether the bus terminating resistor is correctly mounted. |
| Device does not receive GNSS signals. | Check the antenna connection and cable for damage. Position the antenna or the device so that it directly points to the sky. |
| Device does not receive a Cellular signal. | Check the antenna connection and cable for damage. Check the eSIM configuration in the eSIM - Specials object dictionary. Position the antenna or the device so that it directly points to the sky. |
| Device does not log data. | Check the CAN baud rate in the configuration. Check in the configuration whether the device is in "Operational" mode. Check the logging configuration. |
| Device with integrated battery does not initialize after switching on or firmware update. | Use a suitable tool to press the reset button on the main plug connector to restart the device. |
Support Request
Tip
The software tool for further troubleshooting is the CANlink mobile 3000 Device Analyzer software. This software can be downloaded from our Document Library.
The CANlink mobile 3000 DeviceAnalyzer Setup.exe for the software can be found in folder 03_Proemion Tools Software\01_Software\08_CANlink mobile 3000 DeviceAnalyzer.
The manual for the software can be found in folder 03_Proemion Tools Software\01_Software\00_Documentation.
If you do not find the solution to your problem in this manual, please contact our support team. See chapter Service and Support.
The support team requires the following information to help you:
-
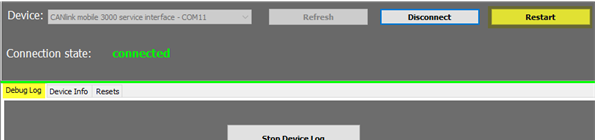
Connect the USB Connector Cable - Diagnostic to your PC and create a device log with the CANlink mobile 3000 DeviceAnalyzer software when the problem appears. While the device log is recorded, click on Restart. This will allow the support team to also evaluate the initialization phase of the device.
-
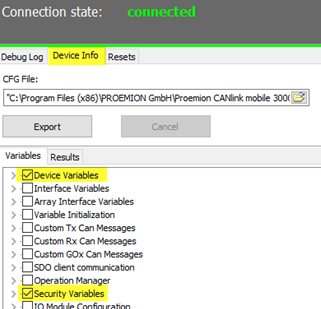
Read out all device and security variables with the CANlink mobile 3000 DeviceAnalyzer.
-
What is the condition of the status LED after the restart was triggered by the DeviceAnalyzer software? If possible, create a video of the status LEDs in addition to the device log including the restart.
-
Send the device log, the video of the status LEDs and the required output about the device and security variables by creating a ticket at Support.
Connection Problems to the DataPlatform
If the device cannot establish a connection to the DataPlatform, check the following:
-
Has the configuration been correctly loaded on the device? See chapter Configuration update.
-
Are the device LEDs lighting up correctly? See Chapter Indicator elements (LED).
-
Are the contract and device settings in the DataPortal correct?
-
Are the configured mobile communication parameters within the device configuration correct?
You can find more information in the following chapter.
DataPortal
Check that the contract and device settings in the DataPortal are correct.
-
Login at the DataPortal.
-
Click on Administration.
-
Click on Overview.
-
Click on COMMUNICATION UNITS.
-
Enable the checkbox Include sub-organizations.
-
Enter the device name or machine name in the corresponding search box.
-
Check in the machine column if the correct/expected machine name is displayed.
-
Check the Organization column if the device is allocated to the correct organization unit.
-
Click on the DETAILS button of the corresponding communication unit.
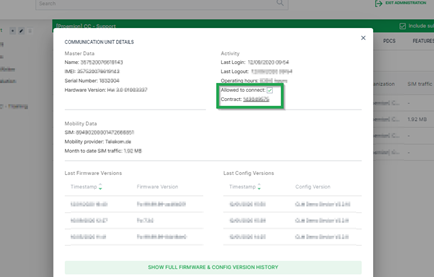
✓ The detail view of the selected device is displayed.
-
Click on the contract number from the contract field to check in the contract overview if the device has a valid contract.
✓ The contracts view of the selected device is displayed.
-
Click on Details.
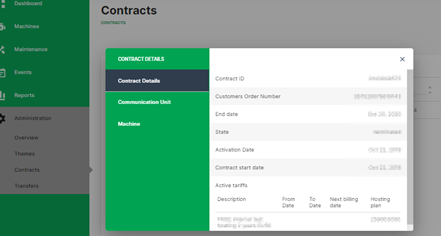
✓ The contract details of the selected contract are opened.
-
Check the contract details for the correct settings.
-
The settings for the communication unit and machine can also be checked in this window.
Device Configuration
Check if the mobile communication parameters in the Proemion Configurator are correct. The variables belong to the Security Variables group. You may use the tables below as a copy/paste template for the information to the support team.
-
Establish a physical CAN connection with a supported gateway device.
-
Start the Proemion Configurator software.
-
Select the correct gateway device and com port in the communication settings.
-
Open the corresponding device configuration file.
-
Open the tab Specials.
-
Read out the configured Security Variables according to the table below and make a note for later reference. If there are security variables missing in the used device configuration, they can be added with a right mouse click onto the tree element
Security Variables.Security Variable Default Value with Proemion eSIM card Read value Remote Server Address gateway.proemion.comRemote Server Port 61200Enable encrypted data transfer 1Online Mode Handling 1[E-SIM] SIM PIN empty [E-SIM] Roaming Handling 1[E-SIM] Operator Selection Mode 0[E-SIM] Operator Selection Code 0[E-SIM] DNS1 [empty][E-SIM] DNS2 [empty][E-SIM] ISP Username [empty][E-SIM] ISP Password [empty][E-SIM] APN iot.truphone.com1[E-SIM] SMS Service Center Address +491710760000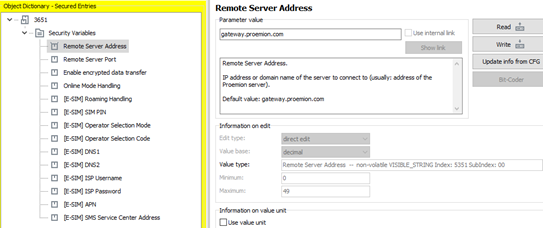
-
Open the Application tab in your configuration.
-
Read out the device variables according to the table below. If there are device variables missing in the used configuration, they can be added by right mouse click onto the object dictionary group Device Variables.
Device Variable Default Value Read value Mobile - Disconnect Mode (embedded_SIM) 1Mobile - Signal Quality (read-only) Mobile - Network State (read-only) Mobile - Modem Result (read-only) Mobile - Network Mode Select 0 Mobile - Network Mode Current (read-only) Mobile - Antenna Status (read-only) Mobile - failure reconnect delay 30 Mobile - State Machine current state code (read-only) Mobile - State Machine Error Code (read-only) Mobile - CMS Error Number (read-only) Mobile - CME Error Number (read-only) Mobile - SIM pin error flag (read-only) Mobile - Engine IMEI Number (read-only) Mobile - SIM Card ID (ICCID) (read-only) Mobile - Active Network Provider (read-only) Mobile - Local IP Address (read-only) Mobile - Engine Version (read-only) Mobile - Maximum Cellular Receive Delay 5000 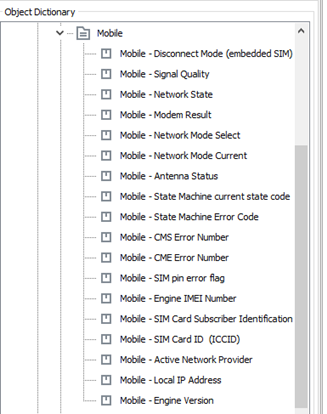
-
Provide the tables with the read-out values to the Proemion support.
Tip
The software tool for further troubleshooting is the CANlink mobile 3000 Device Analyzer software. For Further information on it, please refer to Diagnosis via Micro-USB Port and Support Request.
If you do not find the solution to your problem in this manual, please contact our Proemion support. See also Chapter Service and Support.
Device Configuration for 1Global SIM
Follow steps 1. to 9. as described in Device Configuration above, but use the following Security Variables for devices with 1Global SIM cards.
Note
The ICCID of these SIM cards starts with 894447.
| Variable | Value |
|---|---|
| APN | iot.truphone.com |
| SMS Service Center Address | [blank] |
| Roaming Handling | 1 |
| All other settings | [blank] |
Device Configuration for Nano-SIM Türkiye
Follow steps 1. to 9. as described in Device Configuration above, but use the following Security Variables for devices with Nano-SIM Türkiye SIM cards.
Note
The ICCID of these SIM cards starts with 899001.
| Variable | Value |
|---|---|
| APN | internet |
| SMS Service Center Address | [blank] |
| Roaming Handling | 1 |
| All other settings | [blank] |
Device Configuration for Nano-SIM Brazil
Follow steps 1. to 9. as described in Device Configuration above, but use the following Security Variables for devices with Nano-SIM Brazil SIM cards.
Note
The ICCID of these SIM cards starts with 893204.
| Variable | Value |
|---|---|
| APN | bicsapn |
| SMS Service Center Address | [blank] |
| Roaming Handling | 1 |
| All other settings | [blank] |
-
The APN is preconfigured for Proemion eSIM cards and should not be modified unless explicitly instructed by Proemion support. ↩