Machines Management
The Machines tab is selected by default when opening Settings > Administration > Organization Structure
The following details are displayed:
-
Machines List: Displays a list of machines in the selected (sub-)organization; you can select a machine to move or share it.
Note
Consider that machines may be assigned to different org units, see Organization Unit Management.
-
GO TO MACHINE: Redirects you to the Machine Page
The GO TO MACHINE link is to be found at the end of the line of each machine. -
EDIT: Opens the Manage Machine dialog to change Properties like Machine Name, VIN, etc. or use the Advanced functions, e.g. Device Mode, Time Fence and other Actions.
The EDIT link is to be found at the end of the line of each machine.
Machine Properties can be also accessed via Machine Page.
Figure 1: Go to Machine and Edit links
Move a Machine
Note
The Organization:Maintain permission set is required to move a machine from one organization unit to another.
-
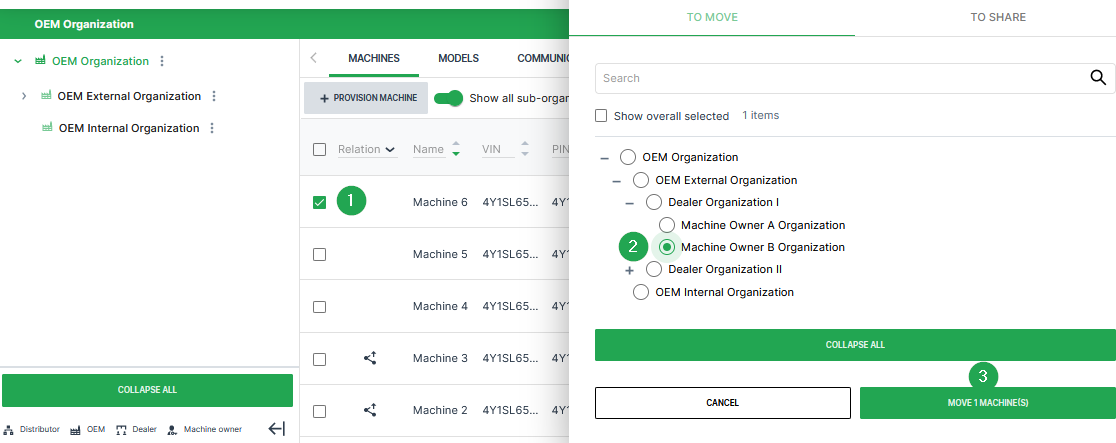
Select the check box(es) of the machine(s) you want to move to open the To Move/To Share dialog.
-
Select an organization that you want to move the machine(s) to from the list of organization units.
-
Click the Move Machines button at the bottom of the dialog to move the machine(s) to the organization unit.
Once you successfully move a machine to another organization, it appears in the list of machines of the organization you have moved it to.
Provisioning
Provisioning allows you to make a machine with a telematics unit installed available on the DataPortal. The machine will be visible and during the process you can assign a model and change the machine name, serial number and PIN/VIN.
The Machine:Admin permission set is required for the tasks that need to be performed for this feature.
Note
The status of the new machine can be verified within Settings > Administration > Contract.
If you want to reactivate a machine with terminated contract that is still visible to your organization, follow the steps described in chapter Reactivation.
If you want to renew the contract of the machine, follow the steps described in chapter Contract Renewal.
If it is no longer visible for your organization, you have to complete the Provisioning and Go Live like for new machines.
Data retention and GDPR
The machine is automatically removed from the DataPlatform three month after contract termination. All historical machine and communication unit (CU) data are permanently deleted and cannot be recovered.
Provision Machine Dialog
To open the provisioning dialog, go to Settings > Administration > Organization Structure and open one of the following tabs from the Top Menu Bar:
-
Machines tab:
- Click the Provision Machine button
 .
.
- Click the Provision Machine button
-
Communication Units tab:
- Click Pending Installation.
- Click the Install button
 . Machines that can be provisioned are displayed in the table.
The provisioning dialog opens.
-
Enter the following data within the provisioning dialog:
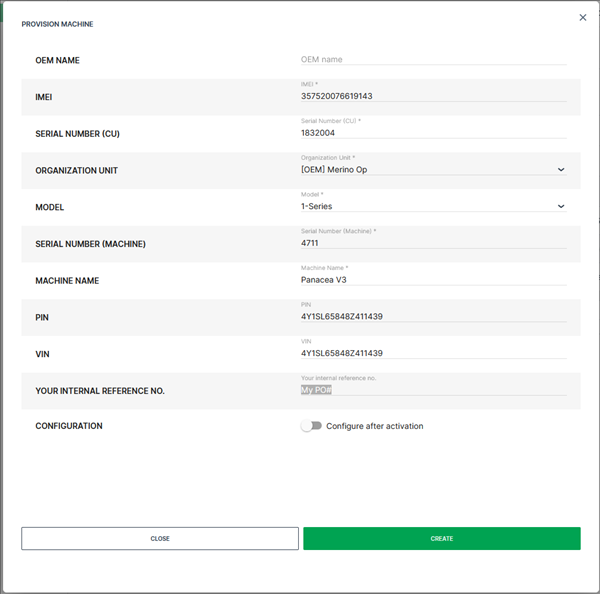
Figure 3: Provision Machine dialog - OEM Name (see also OEM Name)
- IMEI1 (of the communication unit to be provisioned)
- Serial Number1 (of the communication unit to be provisioned)
- Organization Unit1 (where the provisioned machine will be assigned)
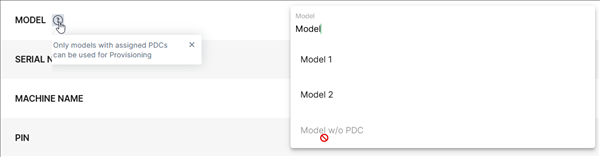
- Machine Model1 (only models with assigned PDC can be selected here; if the model has no PDC assigned, it is greyed out, see following image)
- Serial Number1 (of the machine)
- Machine Name1
- PIN
- VIN
- Your internal reference no.2 (purchase order number for later reference)
- Configuration 2 (if there is a configuration bundle available for the selected CU, the user can enable the automatic configuration update after the activation)
-
Click on Close to exit the provisioning dialog when the message ✓ PROVISION MACHINE SUCCESSFUL appeared.
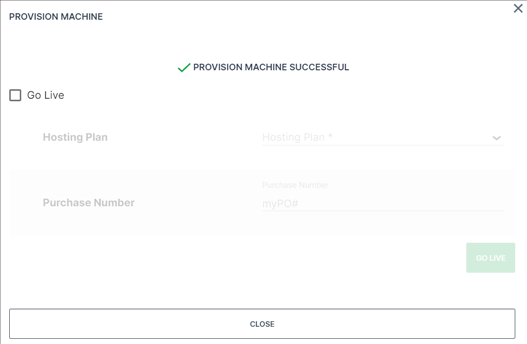
Figure 4: Provision Machine Successful Tip
To perform Go Live immediately after provisioning, click the checkbox and select the required hosting plan.
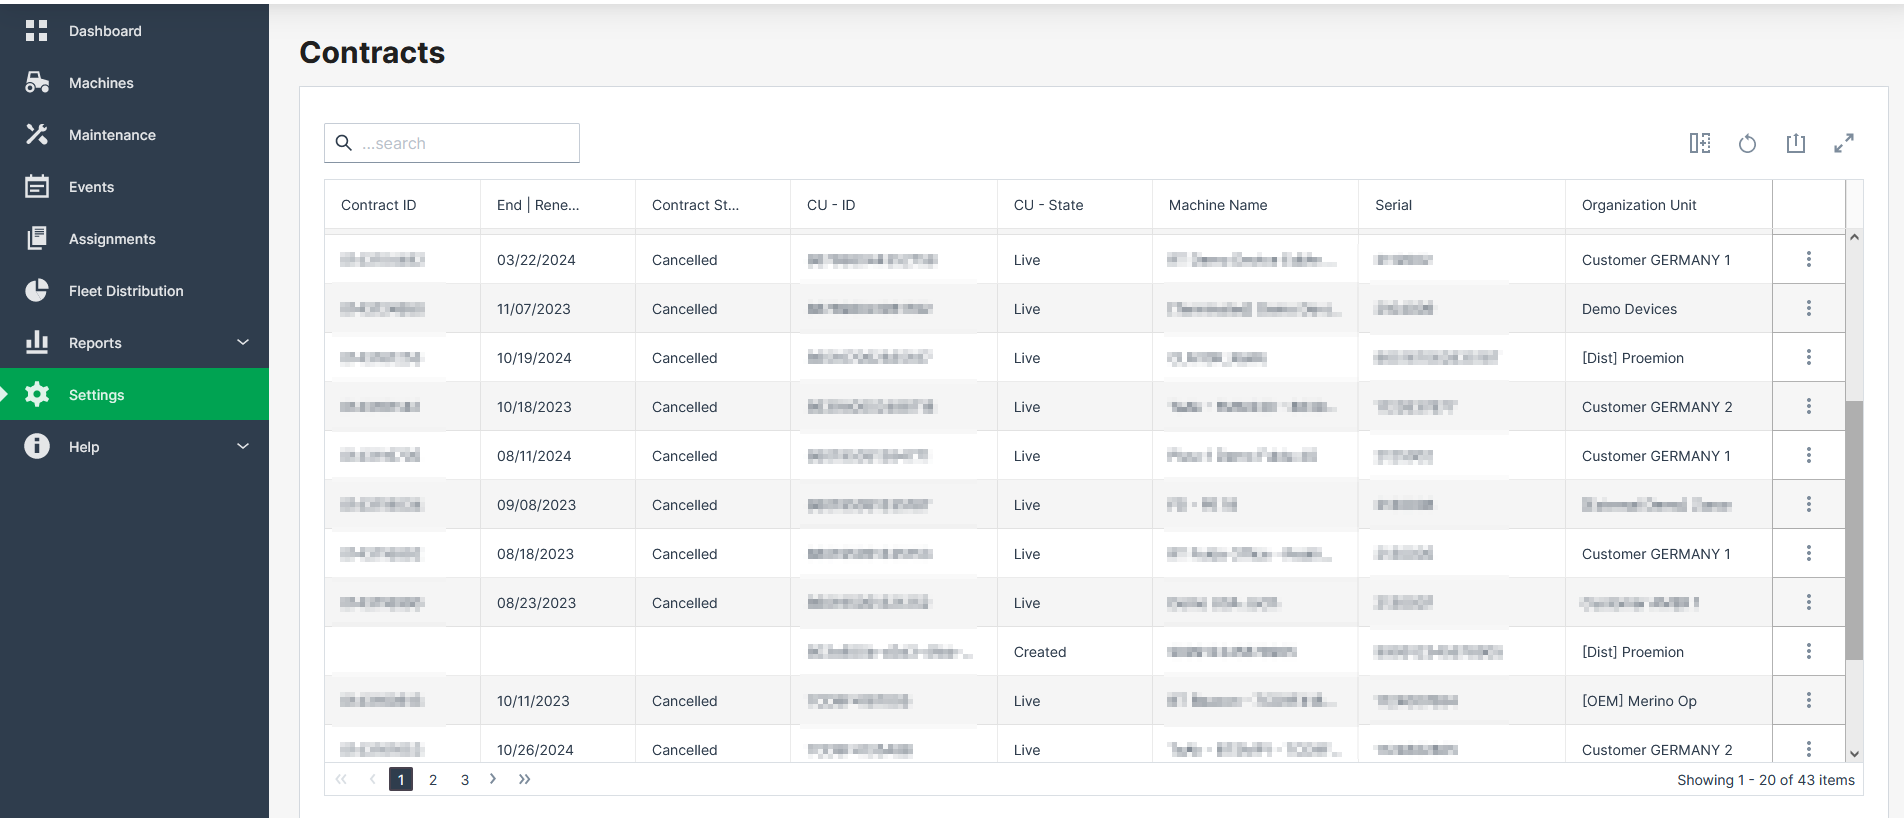
A successfully provisioned machine is visible on the DataPortal within Settings > Administration > Contract and has the state Provisioned
In the Provisioned state, the communication unit is not permitted to connect to the DataPortal and to transfer data until it is Live:
Go Live
Go Live is the activation of Communication Units (CU) after Provisioning. Once the CU has been activated, it is authorized to connect to the DataPlatform and transfer data.
During the activation the following processes are performed:
-
Creating a legal contract between the OEM and Proemion.
-
Enabling the CU for data transfer.
-
Activation of the SIM card.
Note
The automatic activation of the integrated SIM card usually takes about 15 minutes. In exceptional cases it can take up to one working day.
Once these steps have been completed, the CU has the status Live
The hosting contract is enabled and data can be sent to the DataPortal
For information on the availability of the Proemion tariffs for each country, see Cellular Dataplan.
The Contract:Maintain permission set is required for the tasks described below that need to be performed for the Go Live feature.
Note
A pre-set internal reference/purchase number can only be changed by users with Contract:Admin permission set.
Activation of provisioned Communication Unit
There are three options to perform the activation of a provisioned communication unit:
| Option | |
|---|---|
| 1 | Go Live immediately after Provisioning |
| 2 | Go Live in Contracts Overview |
| 3 | Go Live in the Manage Machine Dialog |
Go Live immediately after Provisioning
-
When the message PROVISION MACHINE SUCCESSFUL is displayed after Provisioning of a new machine, enable the Go Live check box.
-
Select the required Hosting Plan.
Note
Note that the list of available hosting plans is based on the CU type to be activated and, therefore, might change depending on the CU type, e.g. CANlink® mobile 3600 or Basic Tracker, etc.
Note
You can view whether the hosting plan supports the (planned) machine location via Supported Countries, i.e. whether the country the machine is or will be located in is covered by the hosting plan.
The supported country can also be checked in the Contracts menu.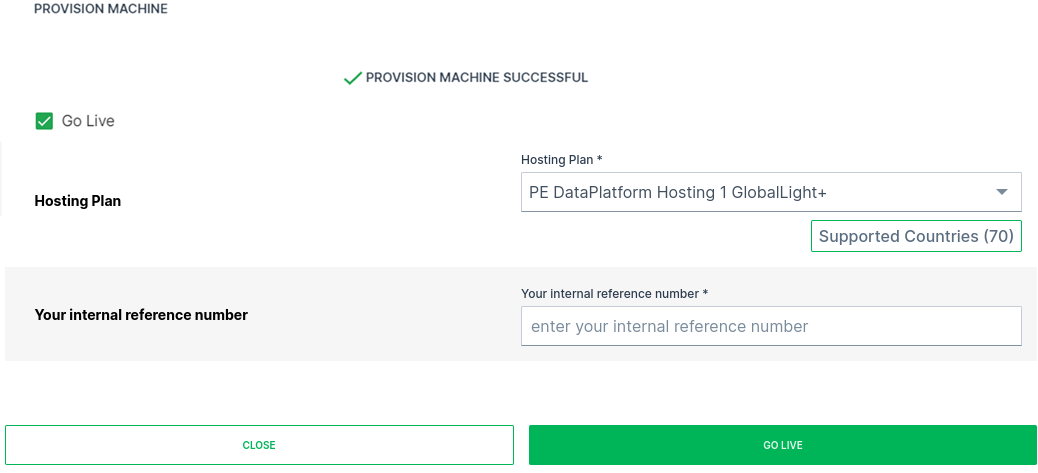
Figure 6: Provisioning to Go Live -
Ensure that the corresponding Your internal reference number is added (the internal reference number can be assigned during Go Live).
-
Click on GO LIVE.
Go Live in Contracts Overview
-
Open Administration > Contracts.
-
Click on the label PROVISIONED at the communication unit which needs to be activated. You may also filter the CU - State column by the label.
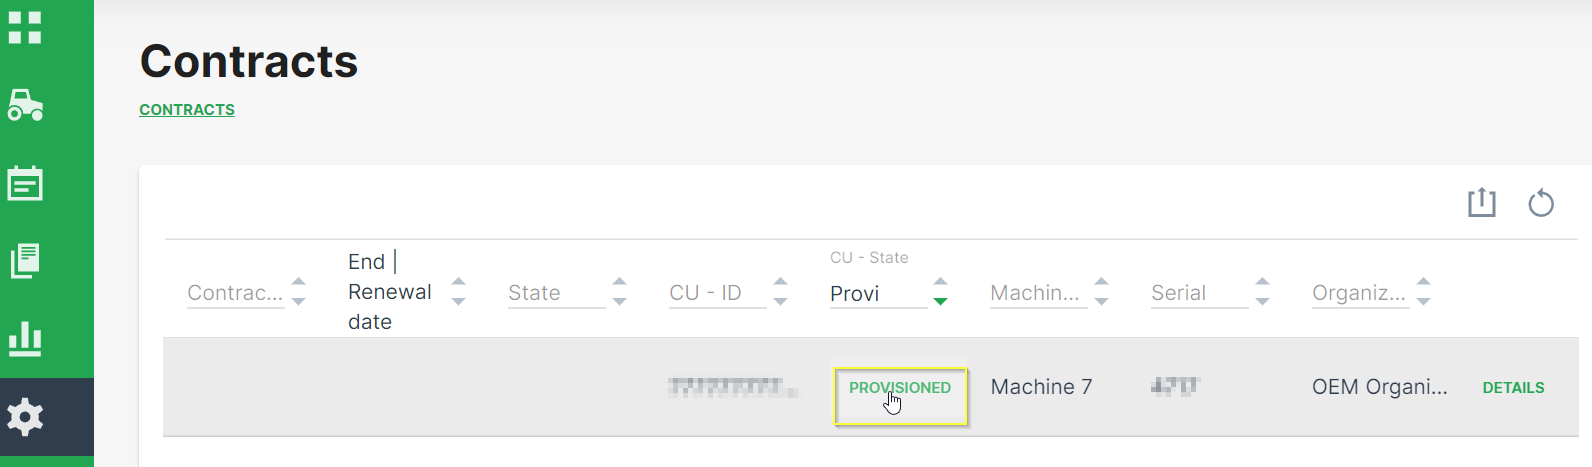
Figure 7: Contract Overview -
Select the required Hosting Plan from the drop-down list.
Note
Note that the list of available hosting plans is based on the CU type to be activated and, therefore, might change depending on the CU type, e.g. CANlink® mobile 3600 or Basic Tracker, etc.
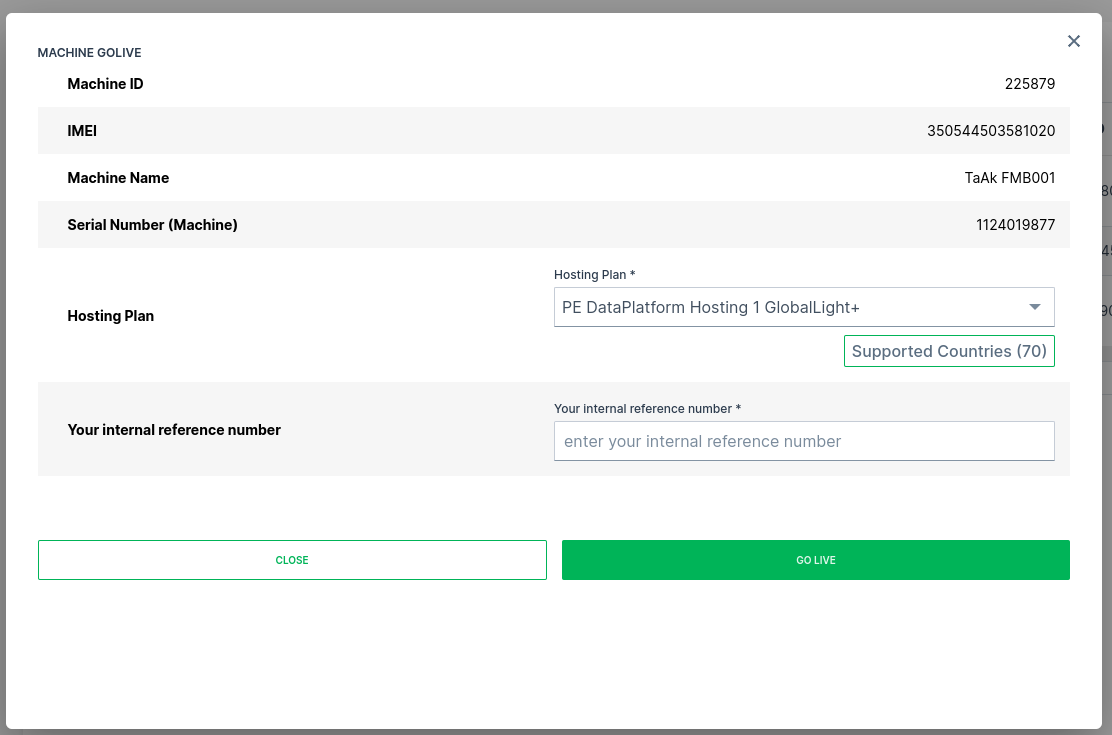
Figure 8: Contract Overview GoLive Dialog -
Ensure that the corresponding Your internal reference number for later reference is entered.
-
Click on GO LIVE.
Go Live in the Manage Machine Dialog
On the Machine Page, select the machine you want to manage and click the Manage Machine vehicle button in the top-right corner.
This opens the Manage Machine window.
-
Open the Machine advanced functions menu and select Machine go live from the left-hand menu.
-
Select Machine GoLive.
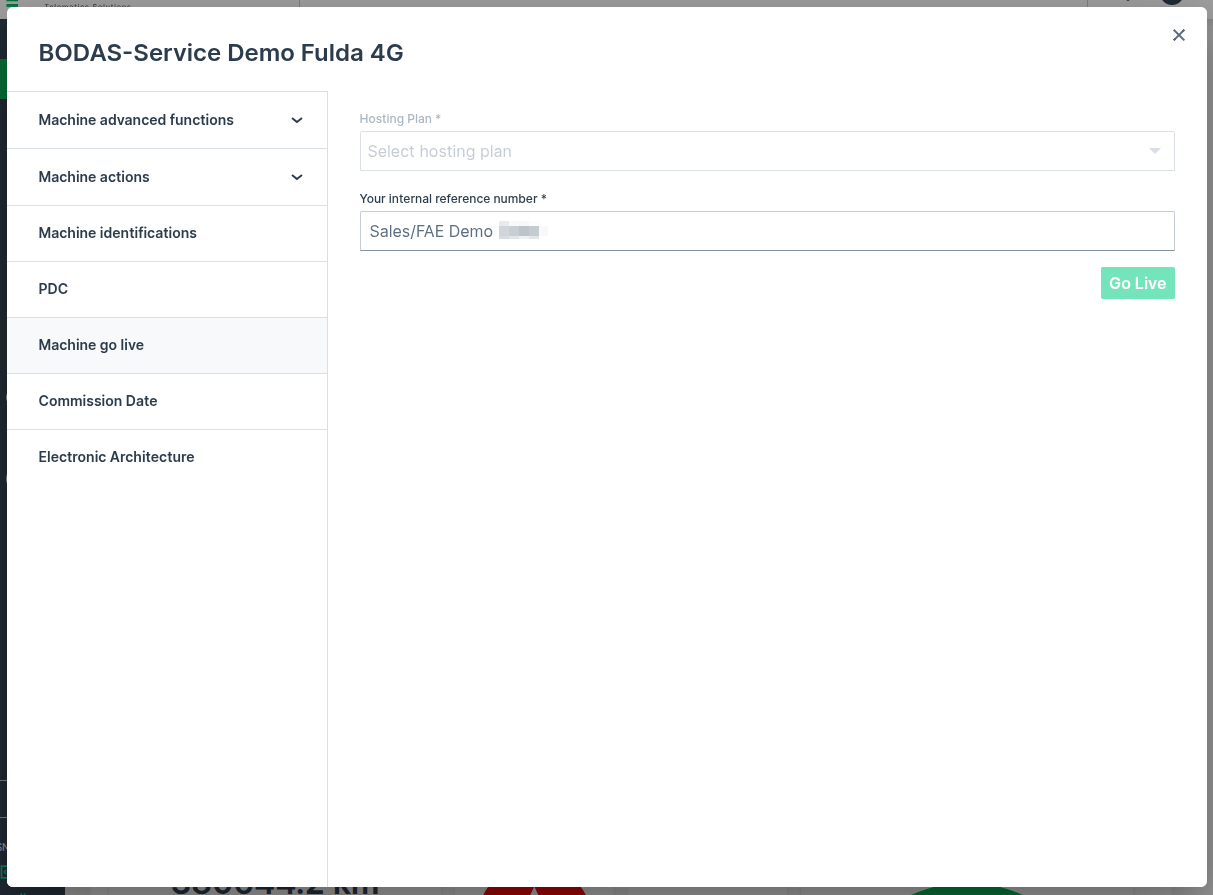
-
Select the required Hosting Plan from the drop-down list.
Note
Note that the list of available hosting plans is based on the CU type to be activated and, therefore, might change depending on the CU type, e.g. CANlink® mobile 3600 or Basic Tracker, etc.
-
Ensure that the corresponding Your internal reference number is added (the internal reference number can be assigned during Go Live).
-
Click on Go Live.
Reactivation
This section refers to the reactivation of a CU with terminated contract. A CU can be reactivated for up to one year after contract termination. Within three months after contract termination, the CU can be reactivated directly using the process described in this chapter. After three month, reactivation is only possible via Provisioning and GoLive.
In case that a machine with terminated contract needs to be reactivated and the machine is still visible to your organization, the following steps must be performed:
-
Go to Settings > Administration > Organization Structure > COMMUNICATION UNITS tab and search for the machine which needs to be reactivated.
-
Click on DETAILS of the corresponding communication unit.
-
Make a note of the: IMEI and Serial Number (of the CU).
-
Go to Settings > Administration > Organization Structure > MACHINES tab and search for the machine which needs to be reactivated.
-
Make a note of the Organization Unit, Model, Serial Number (Machine), (Machine) Name, PIN and VIN.
-
Provision the machine as described in chapter Provisioning.
-
Activate the communication unit as described in chapter Go Live.
Verify Contract Status
The status of the contract can be verified by opening Settings > Administration > Contracts > ![]() > Contract details.
> Contract details.
Share Machine functionality
The Share Machine functionality allows you to grant access to your machines to DataPortal users outside your organization. You should note that a Share Machines functionality to an organization unit means that the parent organization also has identical access to the machine
Additionally, the receiving organization:
-
will see their own widget layout for the machine.
-
can see the owner in the Machine Info on the Machine Page.
-
can assign (e.g. move the share) the machine to one of their own organization units.
-
will receive notifications for shared machines.
-
can not manage the machine because the permission level is automatically set to none.
Note
Share Machine is available in the DataPortal as part of Feature Switches. The Organization:Maintain permission set is required to share a machine from one organization unit to another.
You may also categorize your machine shares, see Machine Share Definitions.
Share a Machine
To share a machine:
-
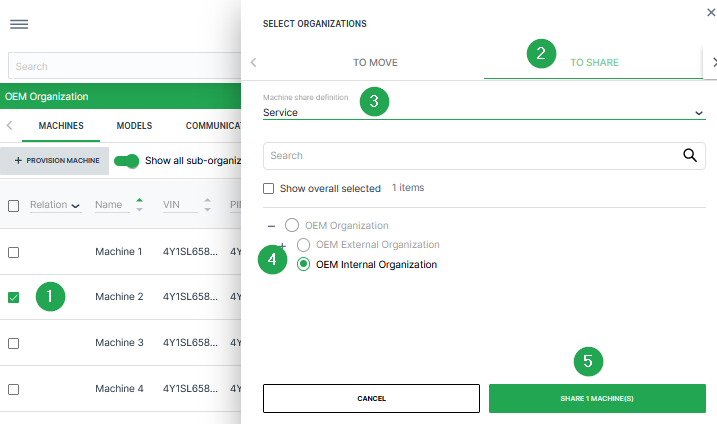
Select the check box(es) of the machine(s) you want to share to open the To Move/To Share dialog.
-
Select the To Share tab at the top of the dialog.
-
Select a Machine Share Definition from the drop-down list underneath the share/move tabs.
-
Select an organization that you want to share the machines to from the list of organization units.
-
Click the Share Machines button at the bottom of the dialog to share the machine to the organization you have selected.
Once you have successfully shared a machine to another organization, it appears in your list of machines with the Share icon ![]() .
.
To remove a share:
-
Go to Settings > Administration > Organization Structure.
-
In the list of machines, click the Share icon next to a machine and select the Delete Share Machines functionality icon.
Geo Areas
Geo Areas are pre-defined areas on the map that can be applied in features which are based on the machine locations, e.g. in the GeoFence feature.
Geo Areas are bound to the business unit of the user creating them.
In the Geo Areas tab, you can individually draw and store these areas. Thereby, you don't need to draw the area manually each time you want to limit the area on the map.
In the according DataPortal feature you can then choose from a list of Geo Areas.
Requirements
-
The required permission set to define, edit, delete or export Geo Areas is GeoAreas:Maintain.
-
GeoAreas can only be created by Tenants where Business Unit is enabled globally. If you create GeoAreas in a sub-organization, it will be automatically assigned to the parent Business Unit.
Create Geo Area
To define Geo Areas, proceed as follows:
-
Open Settings > Administration > Organization Structure > Geo Areas tab. If the Geo Areas tab has already defined Geo Areas, they will be displayed in a table.
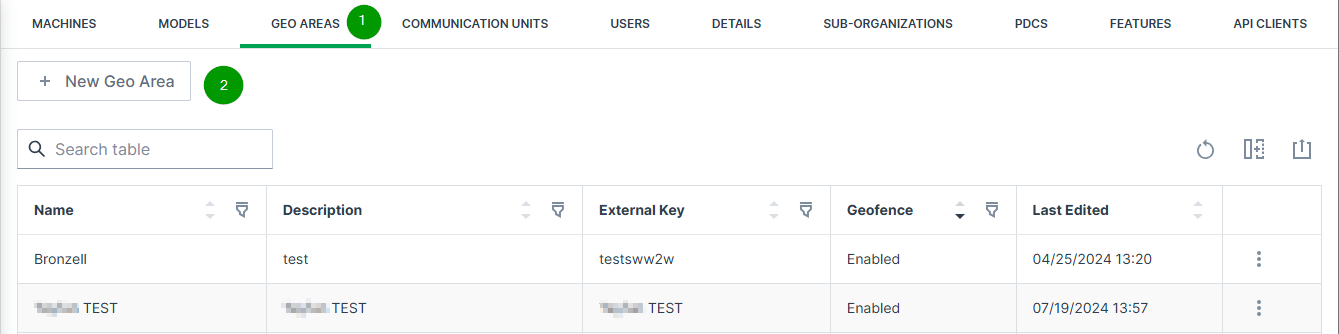
Figure 10: Geo Areas page -
To define a new Geo Area, click
 button. The map opens:
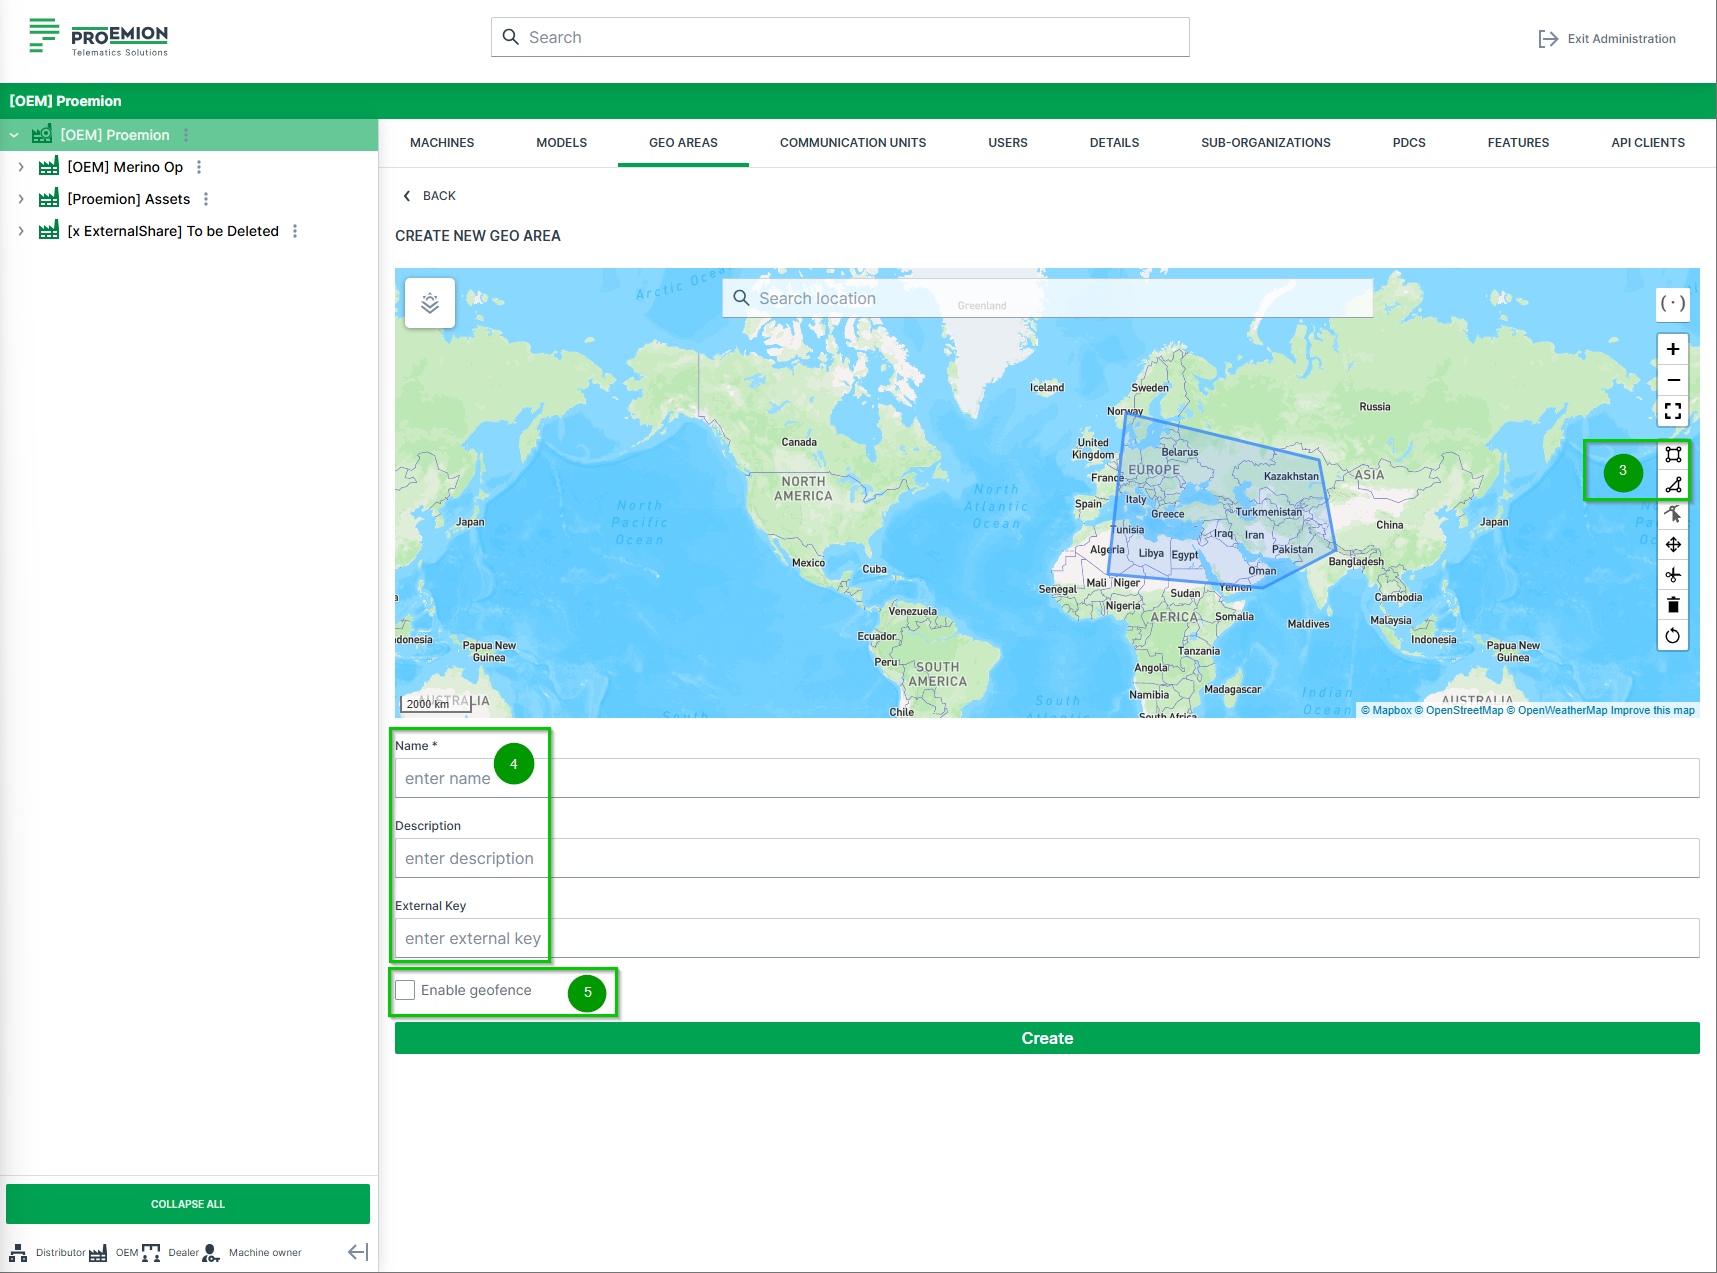
Figure 11: + NEW GEO AREAS -
Draw the Geo Area with the
 rectangle icon or
  polygon icon.
Figure 12: rectangle icon -
Enter a Name, a Description (optional) and an External Key (optional), that can be used to add custom keys, e.g. for reference.
-
Activate or deactivate the option Enable geofence. For more information read section GeoFence.
-
Click create to save your changes.
✓ The new Geo Area is now listed in the page and can be used in the DataPortal.
Edit Geo Area
-
Open Settings > Administration > Organization Structure > Geo Areas tab.
-
In the Geo Areas page, select the
 3-dots at the end of the line of the desired Geo Area to open the available options:
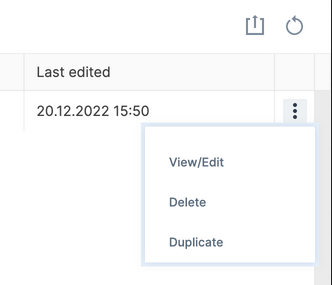
Figure 13: 3-dots -
Select the desired options:
Option Description View/Edit View or edit the selected Geo Area in the map as shown in Create Geo Area. When editing the Geo Area, make sure to use the Edit layer options:  .
.
IMPORTANT: When drawing a new area on the same map by using the polygon or rectangle options, the selected designed Geo Area will be deleted (a warning will be displayed beforehand).After editing, save your changes.Delete Delete the selected Geo Area. The Geo Area will be removed from the Geo Areas page. Duplicate Create a copy of the selected Geo Area. The duplicate will be listed in the Geo Areas page with "Copy" in the name: 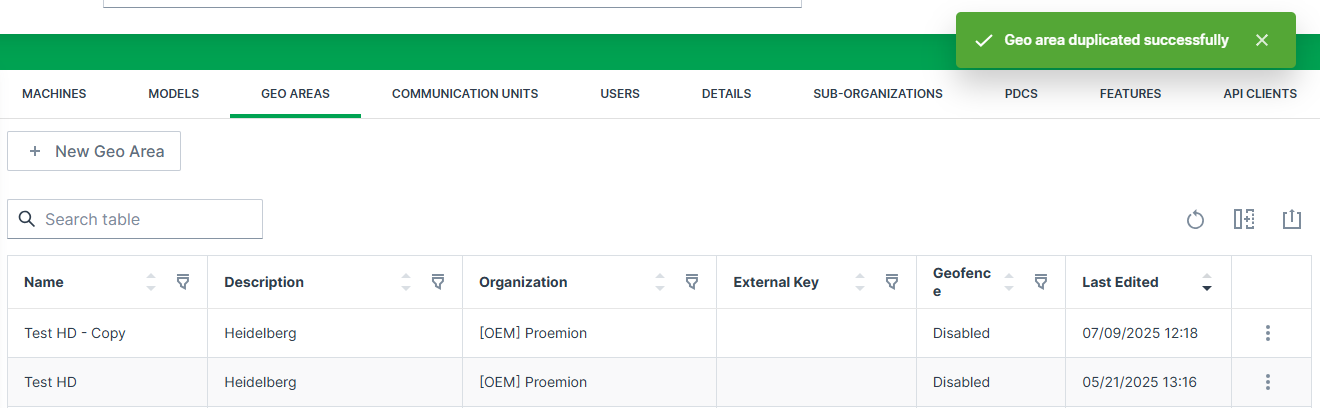
-
- The internal reference number can already be entered in the provisioning dialog. In case that the Go Live process is started at a later time, the correct internal number is already assigned to the machine then.
- The automatic configuration is only available when the Feature Switch for Configuration Management is enabled and if there is a corresponding configuration bundle available for the selected CU.