Connect to Proemion Configurator
The Proemion Configurator is our proprietary software for configuring the Proemion CLM and CLW device families.
A connection is established via CAN to provide a fast and fault-resistant connection.
The software can be freely downloaded from the Proemion Download Center under: 03_Proemion Tools Software > 01_Software.
Connect over CAN bus
Independently of how the device is configured wirelessly, you can connect via CAN bus.
In order to connect to any device on the CAN bus, the device Node ID must be known, and the bus baud rate.
Tip
The default configuration after a Factory Reset has a CAN bitrate of 250 kbit/s, and a Node ID of 34.
PCAN-USB Connection
The Proemion Configurator supports the PCAN-USB dongle. This device plugs into a USB port, and interfaces directly with the CAN bus.
The PCAN-USB dongle is listed on our Software and Accessories page.
Once the PCAN drivers have been installed, and the dongle is connected to the bus, it must be set up in the Proemion Configurator settings.
-
Select Communication Settings.
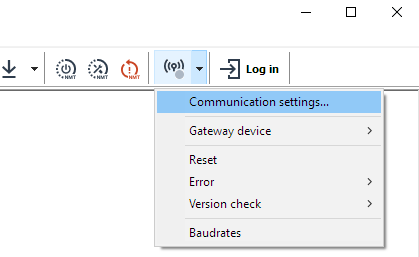
Figure 1: Communication Settings -
Select Peak PCAN-USB

Figure 2: Peak PCAN-USB -
Scan for the correct PCAN dongle..
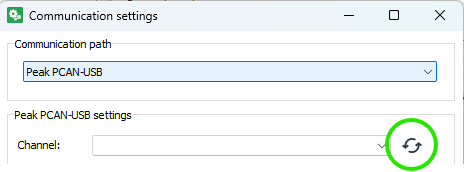
Figure 3: Scan for PCAN-USB -
..and select.
Ensure the selected baudrate is the same as the CAN bus.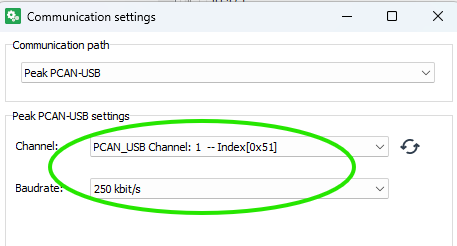
Figure 4: Select PCAN-USB -
Click 'OK', and the Connection Settings icon will turn green if the PCAN dongle is communicating with the Proemion Configurator.
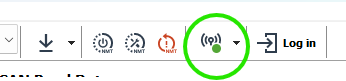
Figure 5: Green connection
DOD files
The Proemion Configurator uses a .DOD file to read from, and write to the device for full configuration.
Sample .DOD files are provided for use, and can be found in the following location:
-
Enter
%AppData%into the Windows File Explorer address bar.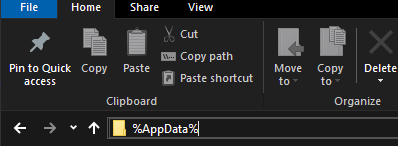
Figure 6: Automatic update -
This will be expanded to a directory under your user profile.
- From this directory, navigate down through the following directories:
- Proemion GmbH
- Configurator (or Proemion Configurator)
- Device-Application-Data
- Demos
- CANlink wireless 4000
- Here you will find several
.DODfiles to use, and form the basis of your intended device configuration.
Note
All the files in this directory are automatically updated daily (when the Proemion Configurator is run).
If you modify a file in this directory and want to revert back to the default version, simply delete the file, and it will be re-downloaded.
When modifying these files, we recommend to save to some other directory, and keep these as a reference.
There are two main types of .DOD files in this directory:
- 'Default'
.DODs clw4001_Default.DODclw4003_Default.DOD- More specific
.DODs
The 'default' files are provided for both the 4001 (internal antenna) and 4003 (external antenna) models.
These provide all the objects typically required to configure the device. If needed, additional object can be added.
These files are valid for the latest firmware release.
The other more specific .DODs are much smaller, and offer only what is required to configure basic needs for a specific use: Configuring a device as a Bluetooth Server, for example.
The same configuration may be done with the 'default' .DODs - but the addition possibilities may be overwhelming to the new user.
Loading a DOD
A .DOD file may be double-clicked in Explorer, or opened through the Configurator File > Open menu option.
Reading and Writing Objects
The Proemion Configurator uses the .DOD to read and write the device CANopen Object Dictionary.
The same objects are available and documented in the .EDS distributed with the firmware in the Proemion Download Center.
Each item in the Object Dictionary list contains the Index and Sub-Index of the object that it represents.
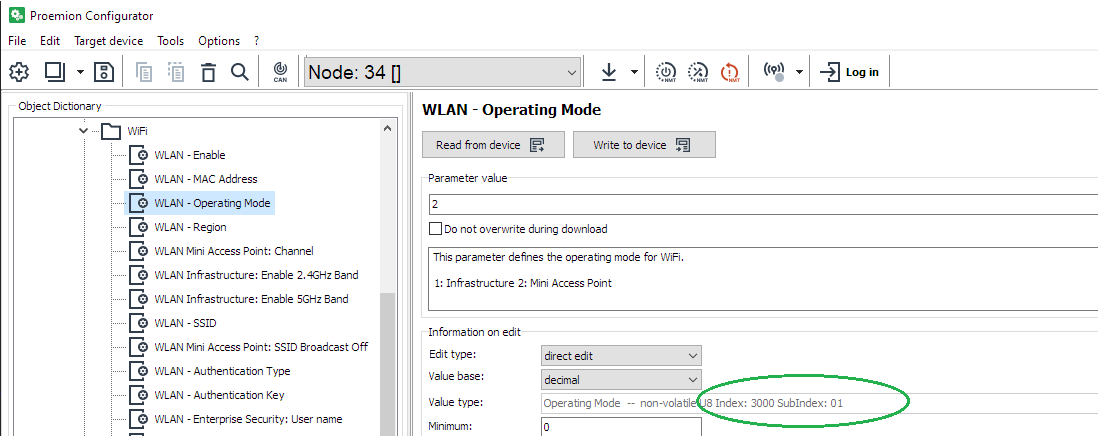
According to the read/write nature of that object, it can be interacted with in that way.
The 'Read from device' and 'Write to device' buttons are enabled according to the properties of the selected object.
Writing (setting properties)
There are several methods for writing individual or all entries.
Right-click on the object
Select one or more objects, and right-click.
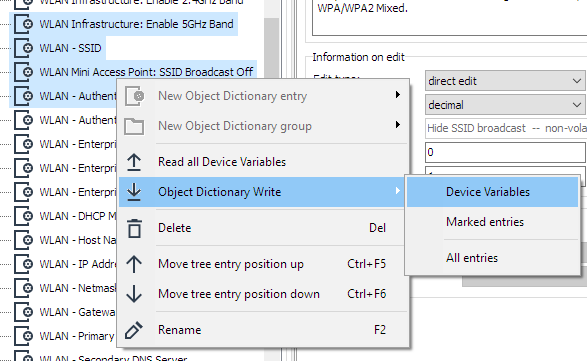
This brings up a context menu in which you can select to write:
-
Device Variables This writes all Device Variables to the device
-
Marked entries This writes the highlighted (selected) entries. In the example above, four entries would be written.
-
All entries This option writes all Device Variables, as well as any Custom CAN settings.
Write to device
Select an object to bring that into context, and click the 'Write to device' button to write only that object.
Target device Menu
The menu can also be used to write objects, in a similar way to a right-click.
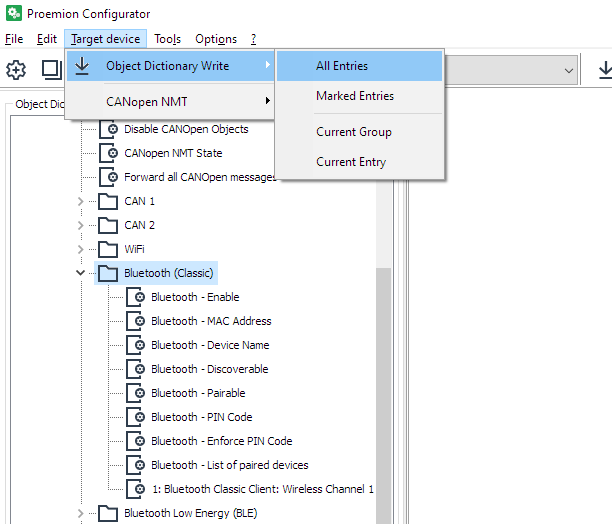
-
All Entries All Device Variables will be written.
-
Marked Entries This writes the highlighted (selected) entries.
-
Current Group In this image, all the objects in this 'folder'
-
Current Entry The current highlighted object(s)
Updating Proemion Configurator
The Proemion Configurator automatically downloads the latest configurations files necessary for configuring the {{ clw_4k }}, as well as updating the application itself.