Remote Machine Tunnel
The Remote Machine Tunnel feature allows secure remote access to device services that are connected to the same Ethernet network as the CANlink® mobile 10000. This includes remote access to the CANlink® mobile 10000 itself.
Since the CANlink® mobile 10000 supports the CODESYS EdgeGateway service, it can also be used remotely to access other CODESYS-compatible devices on the same local network. The CODESYS EdgeGateway service is disabled by default and must be enabled via the device configuration.
A Remote Machine Tunnel can expose one or more endpoints.
Each tunnel provides secure access to one or more services on the device through user-defined endpoints.
Only one tunnel can be active at a time. Running multiple tunnels simultaneously is not supported.
All communication via the Remote Machine Tunnel is encrypted. For HTTPS-based services, HTTPS endpoints use the built-in HTTPS encryption of the service itself.
For TCP based services, additional client-side TLS encryption may be required. This is handled by the Remote Machine Tunnel Client.
Preconditions
Before you can use the Remote Machine Tunnel feature, the following requirements must be met:
-
Device type:
Only the CANlink® mobile 10000 supports Remote Machine Tunnel. -
Firmware version:
The feature requires firmware version 2.0.0 or higher. -
Online status:
The device must be online to successfully establish a tunnel connection to the DataPortal. However, tunnel actions (create, start, stop) can also be configured while the device is offline. In this case, the tunnel will initially fail to connect, but the connection will be established automatically once the device is online. This allows a tunnel to be preconfigured and ensures it connects as soon as the device is reachable. -
User permissions:
The user must have the Realtime:Admin Permission Set. -
Service availability:
Only services that are enabled and running on the CANlink® mobile 10000 can be accessed through a tunnel.
If a service such as CODESYS EdgeGateway or WebVisu is disabled on the device, the corresponding endpoint will not be reachable.
Note
The Remote Machine Tunnel does not activate or configure services on the device.
Services must be enabled on the CANlink® mobile 10000 before they can be accessed through an endpoint.
Terminology
The following table defines key terms used when working with a Remote Machine Tunnel between the DataPortal and the CANlink® mobile 10000. Understanding these terms will help clarify the concepts referenced throughout this documentation.
| Term | Context | Description |
|---|---|---|
| Endpoint (DataPortal) | DataPortal | A configuration in the DataPortal that defines how a remote connection should be established. Specifies Target IP, Target Port, Protocol (HTTPS or TCP), and a user-defined Endpoint Name. Not an active connection, just the definition of one. An endpoint does not guarantee that the target service is available. Service availability depends on the device configuration. |
| Service (CANlink® mobile 10000 local UI) | CANlink® mobile 10000 | A network-accessible function running on the device, such as the Web UI (HTTPS), CODESYS WebVisu, CODESYS EdgeGateway, or any other process listening on an IP address and port. A Service must exist and be reachable for the tunnel to succeed. |
| Tunnel | Connection | A secure, temporary connection that becomes active when one or more endpoints are started. Connects the configured endpoint to the remote user, uses encrypted communication, generates a temporary Access URL, and expires after a session timeout or when manually stopped. A tunnel session may include multiple endpoints. |
| Access URL | DataPortal | A randomly generated temporary URL that is created when a tunnel starts. It forwards remote traffic securely to the endpoint’s target service. The URL is valid only for the duration of the tunnel session (default up to 4 hours) and is revoked once the tunnel expires. |
Overview Page
To open the Remote Machine Tunnel Overview Page, choose a CANlink® mobile 10000 machine from the Machines Overview Page and click the Remote Machine Tunnel icon in the upper right corner.
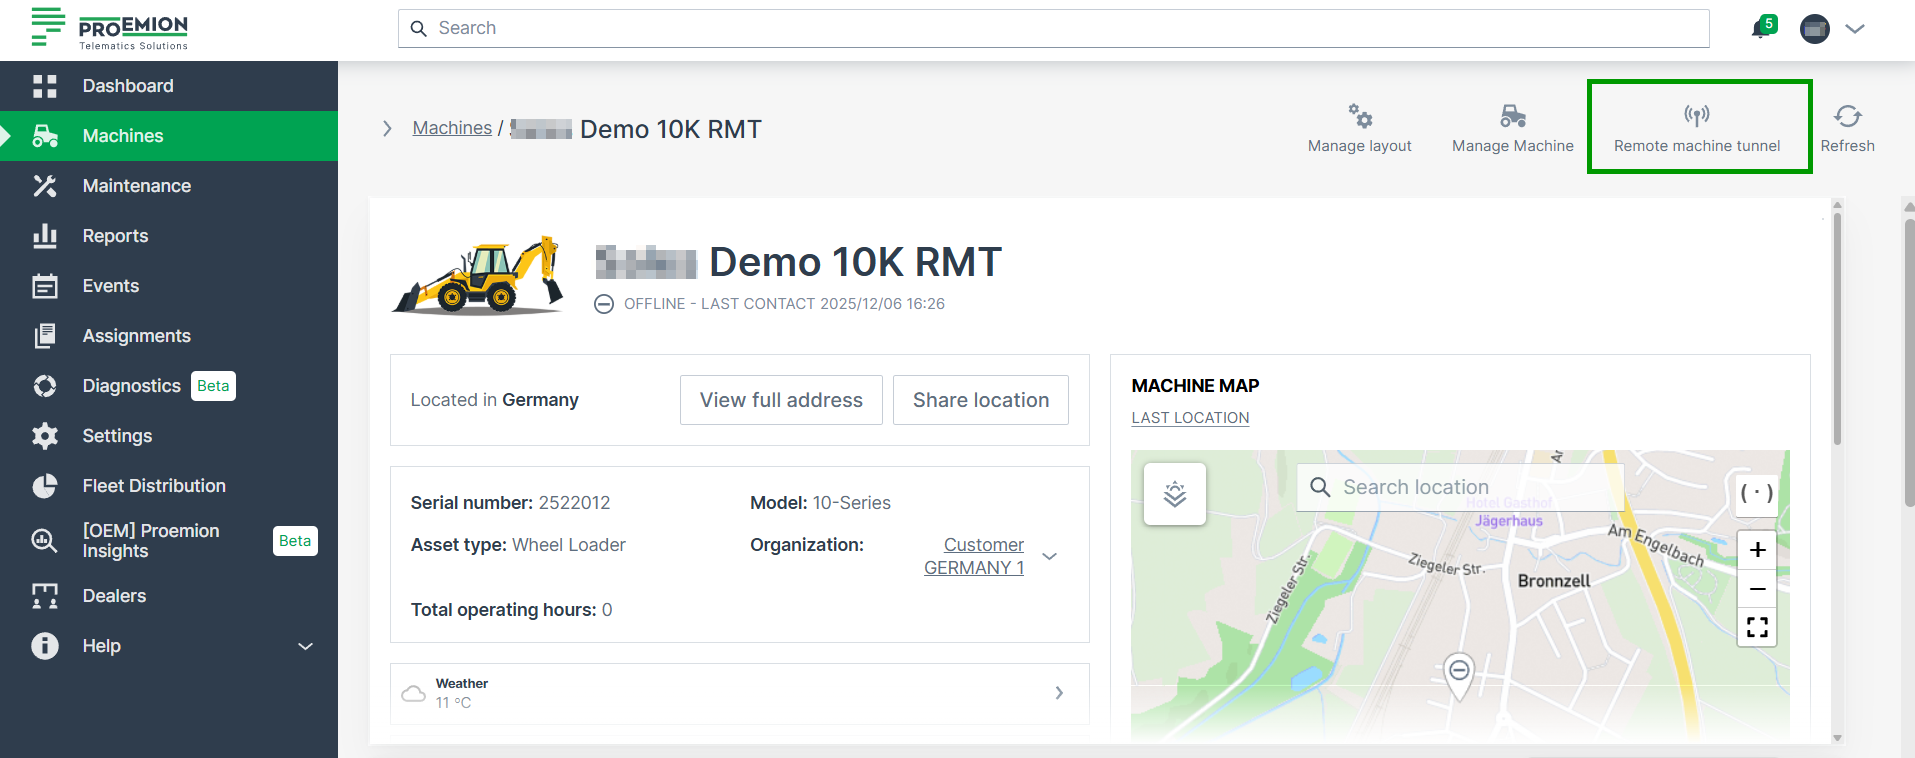
On the Overview Page, the following information is available:
-
Machine Name
The name of the selected CANlink® mobile 10000 as shown in the Machines Overview. -
Online / Offline Status
Indicates whether the device is currently connected to the DataPortal. -
Last Contact
Timestamp of the most recent successful communication between the device and the DataPortal.
| Column | Description |
|---|---|
| Endpoint Name | Unique user-defined name of the endpoint; must be globally unique per machine. Only alphanumeric characters, underscores, and hyphens are allowed. |
| Endpoint Address | Generated remote tunnel address (Access URL). Clickable link for HTTPS endpoints; can be copied via the copy button or opened in a new browser tab. |
| Target IP | IP address of the service the endpoint should access through the tunnel. For services running on the CANlink® mobile 10000, 127.0.0.1 is typically used.If, for example, a display is connected via Ethernet, the IP address of the display that was specified for this communication channel must be used. |
| Target Port | Port on the target device that the tunnel forwards traffic to (for example 443, 8080, 1217). |
| Type | Protocol type selected for the endpoint. Possible values: • HTTP/HTTPS – for browser-based web UIs • TCP – for tunneling generic TCP services (for example CODESYS EdgeGateway). |
| Status | Current state of the endpoint’s tunnel. Possible states: • not started – endpoint is configured, but its tunnel has never been started • disconnected – the tunnel was started at least once, but is currently not active (for example stopped by user or expired) • unknown – a tunnel action was requested, but the device has not yet reported a definitive state • connected1 – tunnel is successfully established and active • failed – the tunnel could not be established • An unexpected error occurred. – Generic or unspecified error • Failed to resolve the remote address. – DNS or hostname could not be resolved • The connection to the machine could not be established. – Unable to establish a connection to the device • Protocol error during communication. – Protocol mismatch or invalid communication • Authentication failure. – Authentication with the remote device failed • Internal system error. – Unexpected internal system failure • Heartbeat failure. – Tunnel lost connection due to heartbeat timeout |
Endpoint Management
The following documentation guides you through the steps when creating, starting, stopping, editing and deleting an endpoint.
Adding Endpoints
To add an endpoint, proceed as follows:
-
Choose a CANlink® mobile 10000 machine from the Machines Overview Page and click the Remote Machine Tunnel icon in the upper right corner. The Remote Machine Tunnel overview page opens.
-
Click + Add endpoint to start the configuration. The configuration form opens.
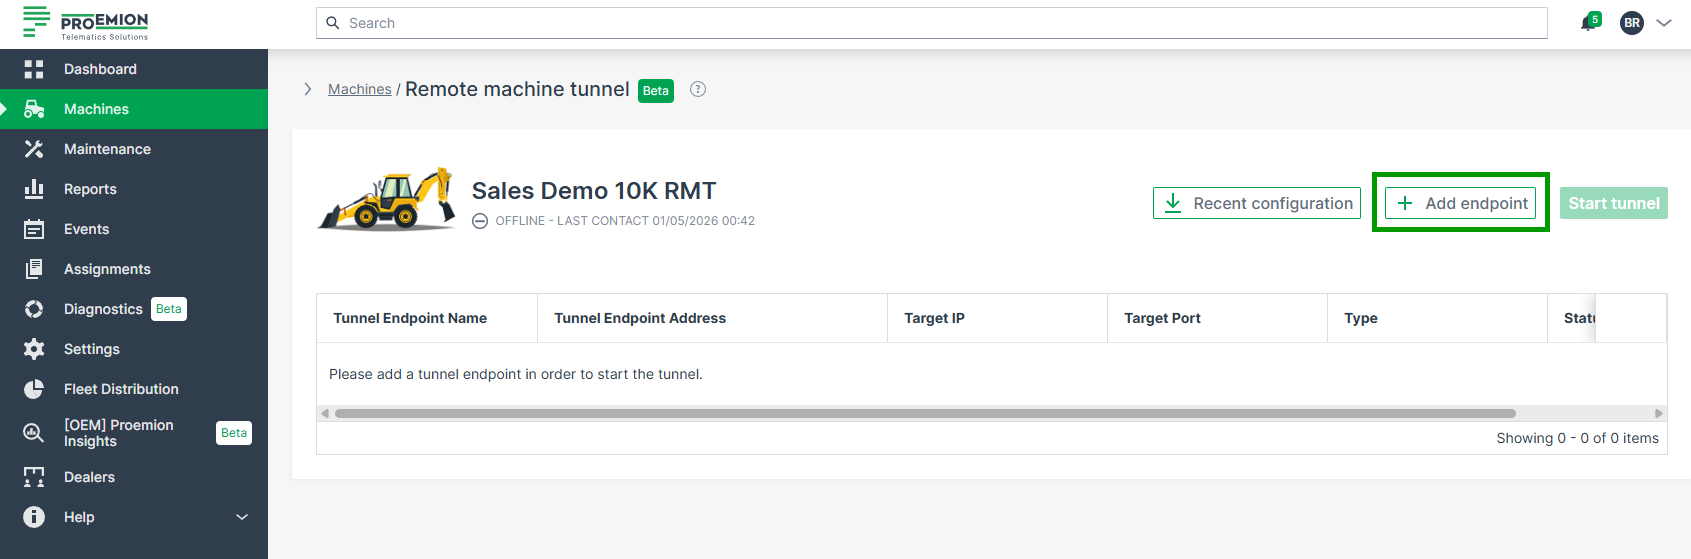
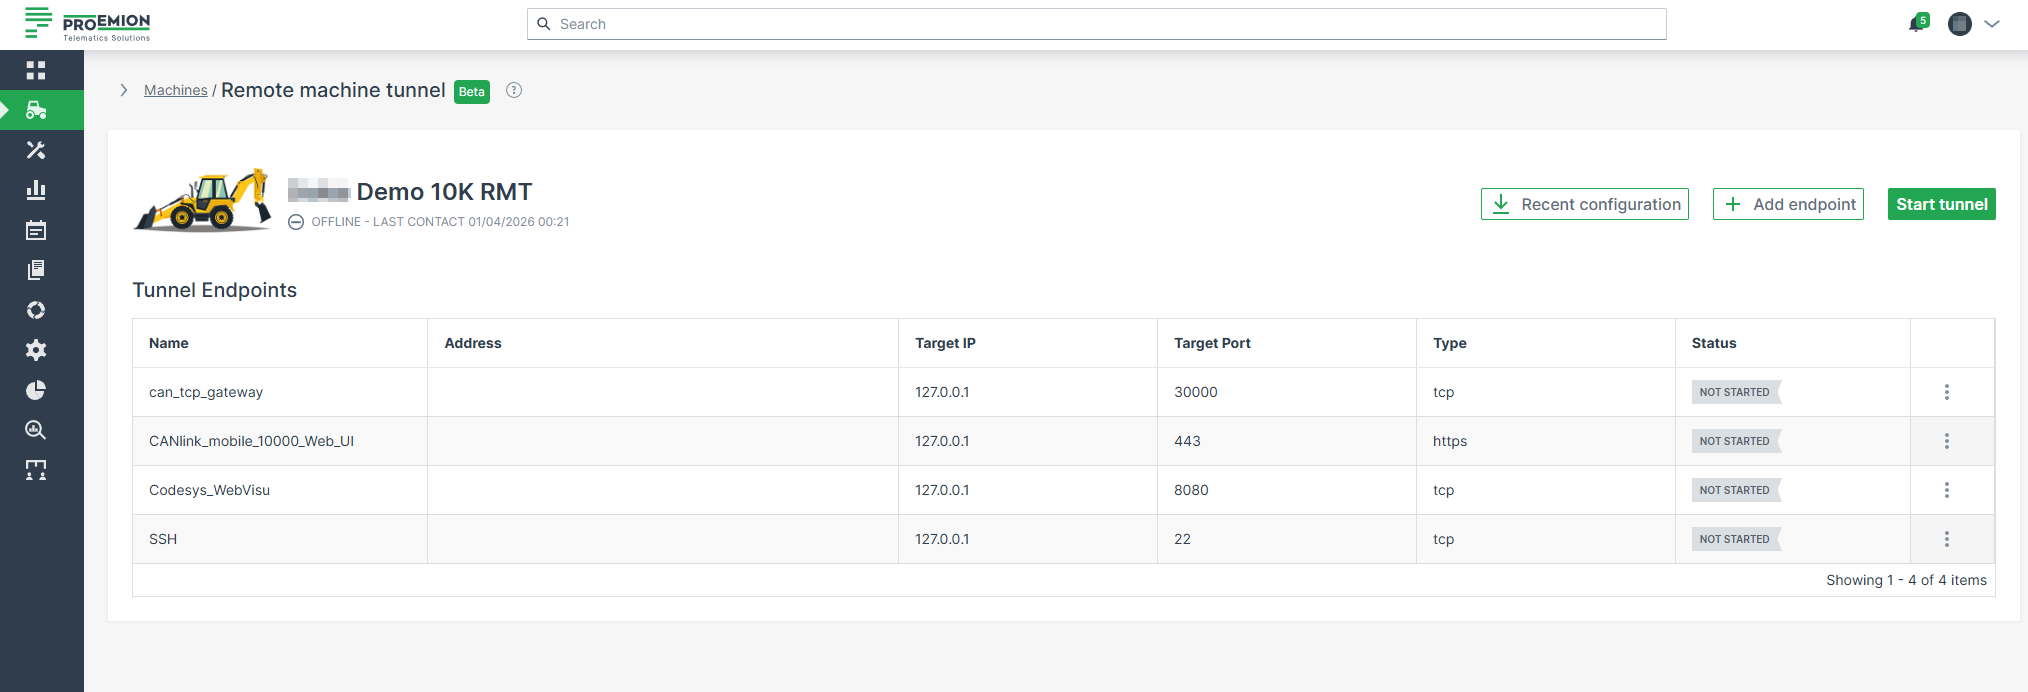
Figure 3: Remote Machine Tunnel Overview -
Fill out the form. Available fields:
- Endpoint configuration (optional):
Choose from predefined configuration options (see table below).
Selecting an option automatically fills in the endpoint type, name, Target IP, and Target Port. -
Endpoint type (mandatory): Choose the endpoint type. Available types are: HTTPS, HTTP, TCP
-
Endpoint name (mandatory):
If using a predefined configuration from the dropdown, the name is prefilled accordingly.
Only alphanumeric characters, underscores, and hyphens are allowed (1–255 characters).
The endpoint name must be unique per machine. -
Target IP (mandatory):
Enter the IP address of the service you want to access through the tunnel.
For services running on the CANlink® mobile 10000, use127.0.0.1.
For services hosted on external devices in the same local Ethernet network (e.g., HMI or display units), enter the IP address assigned to that device. -
Target Port (mandatory):
Enter the port on which the service is listening.
Common examples include:443for HTTPS-based user interfaces8080for visualization services (e.g., CODESYS WebVisu)1217for CODESYS EdgeGateway
The port must match the actual service configuration.

Figure 4: Remote Machine Tunnel Configuration Form
- Endpoint configuration (optional):
A confirmation message appears when endpoint creation succeeds: Endpoint has been added successfully. Start tunnel to get the endpoint address.
Predefined configuration types
| Configuration Name | Target IP | Target Port | Type |
|---|---|---|---|
| CANlink mobile 10000 Web UI | 127.0.0.1 | 443 | HTTPS |
| CODESYS WebVisu | not prefilled, must be specified by the user | 8080 | HTTP |
| CODESYS EdgeGateway | 127.0.0.1 | 1217 | TCP |
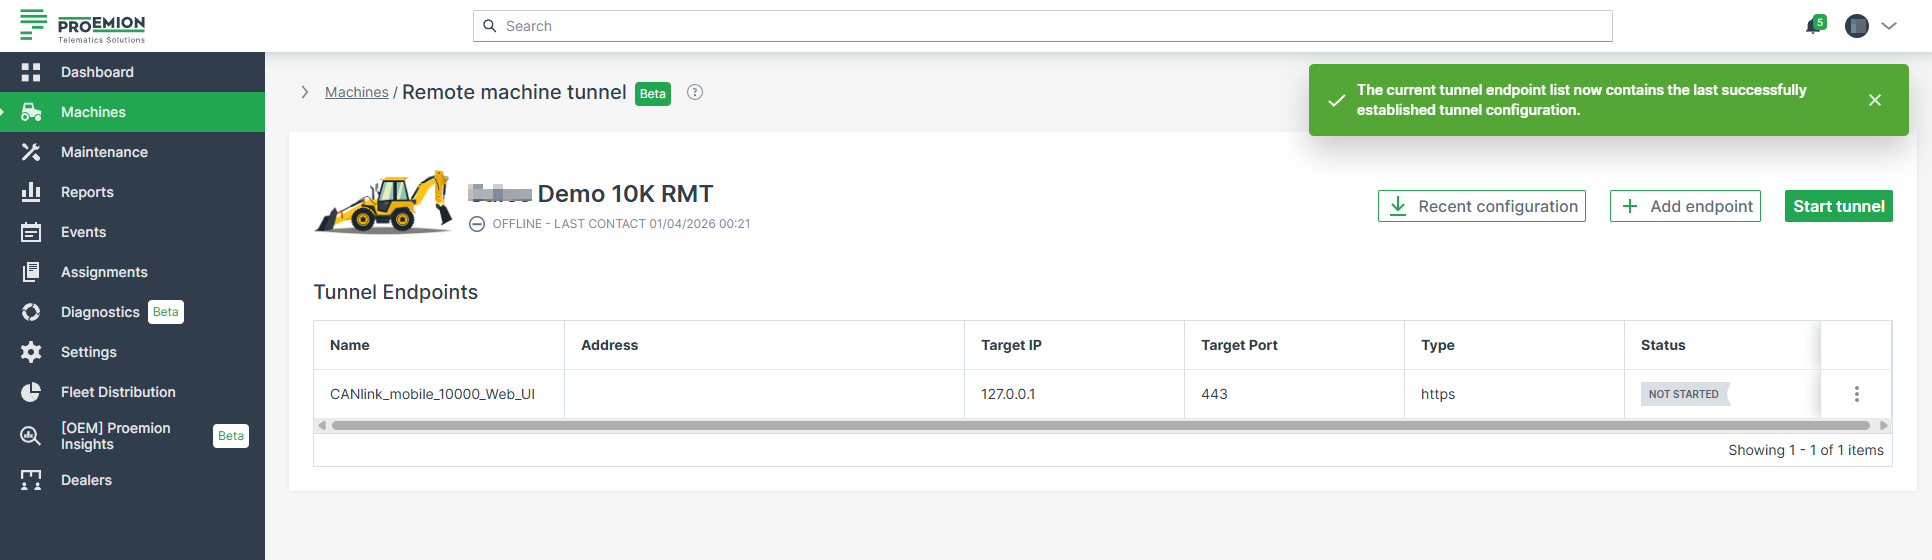
Recent Configuration
To restore the most recent successfully established tunnel endpoint configuration, use the Recent configuration button. Once clicked, the tunnel configurations appear in the table and a confirmation message appears: The current tunnel endpoint list now contains the last successfully established tunnel configuration.
Duplicate Endpoint Validation
The system prevents users from creating duplicate endpoints:
- An endpoint name cannot be reused. If the name already exists, the UI displays: Endpoint name already exists. Please choose a different name.
- A target address and port combination must be unique. If it is already used by another endpoint, the UI displays: This address:port combination is already used by another endpoint. Please choose a different address:port combination.
Starting & Stopping a Tunnel
To start a tunnel, the user must first create at least one endpoint; the Start tunnel button remains disabled until an endpoint exists. Once a tunnel is started, the DataPortal displays the confirmation message Tunnel creation request sent successfully. While a tunnel is running, endpoint management actions — adding, editing, and deleting — are disabled. Users can still copy the endpoint address, which triggers the confirmation message Endpoint address copied to clipboard.
To stop a running tunnel, the user selects Stop tunnel, which immediately terminates all active connections. Endpoint management actions — adding, editing, and deleting — are available again.
You cannot stop individual endpoints; all active endpoints from a tunnel are stopped at the same time.
Editing Endpoints
Endpoints can be edited when no tunnel is running.
When a tunnel is active, endpoint management is disabled and the Edit option is not available.
Once a tunnel has been stopped, the endpoint configuration can be adjusted again.
To do so, proceed as follows:
-
Open the 3-dots menu at the end of the row of an endpoint and choose the Edit option.
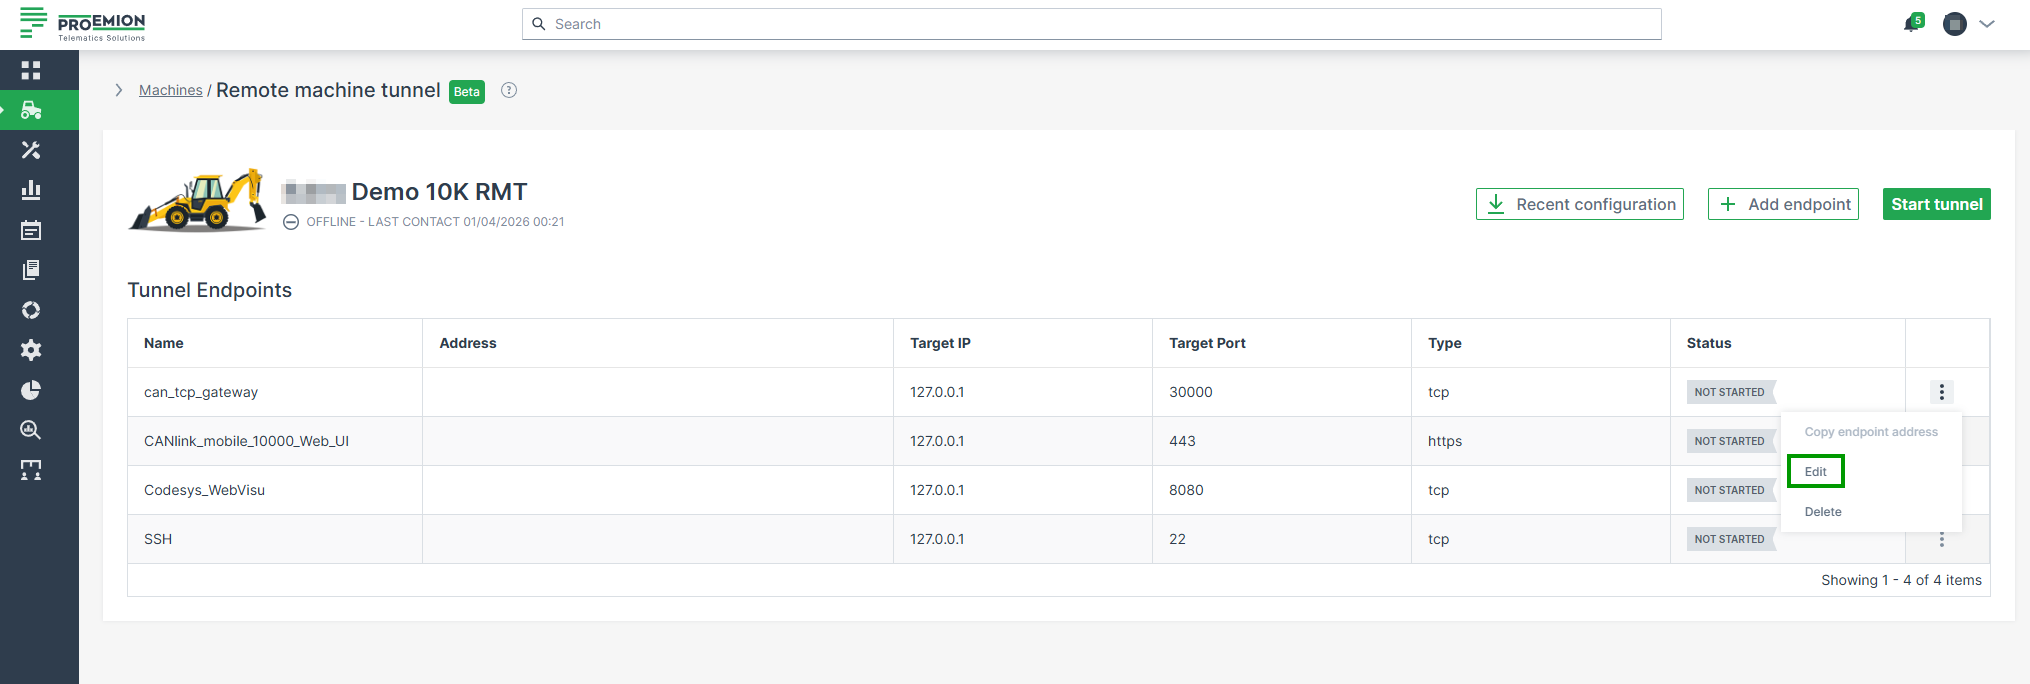
Figure 6: Edit Endpoint -
Edit the configuration as described in Adding Endpoints.
-
Click Update to apply your changes.
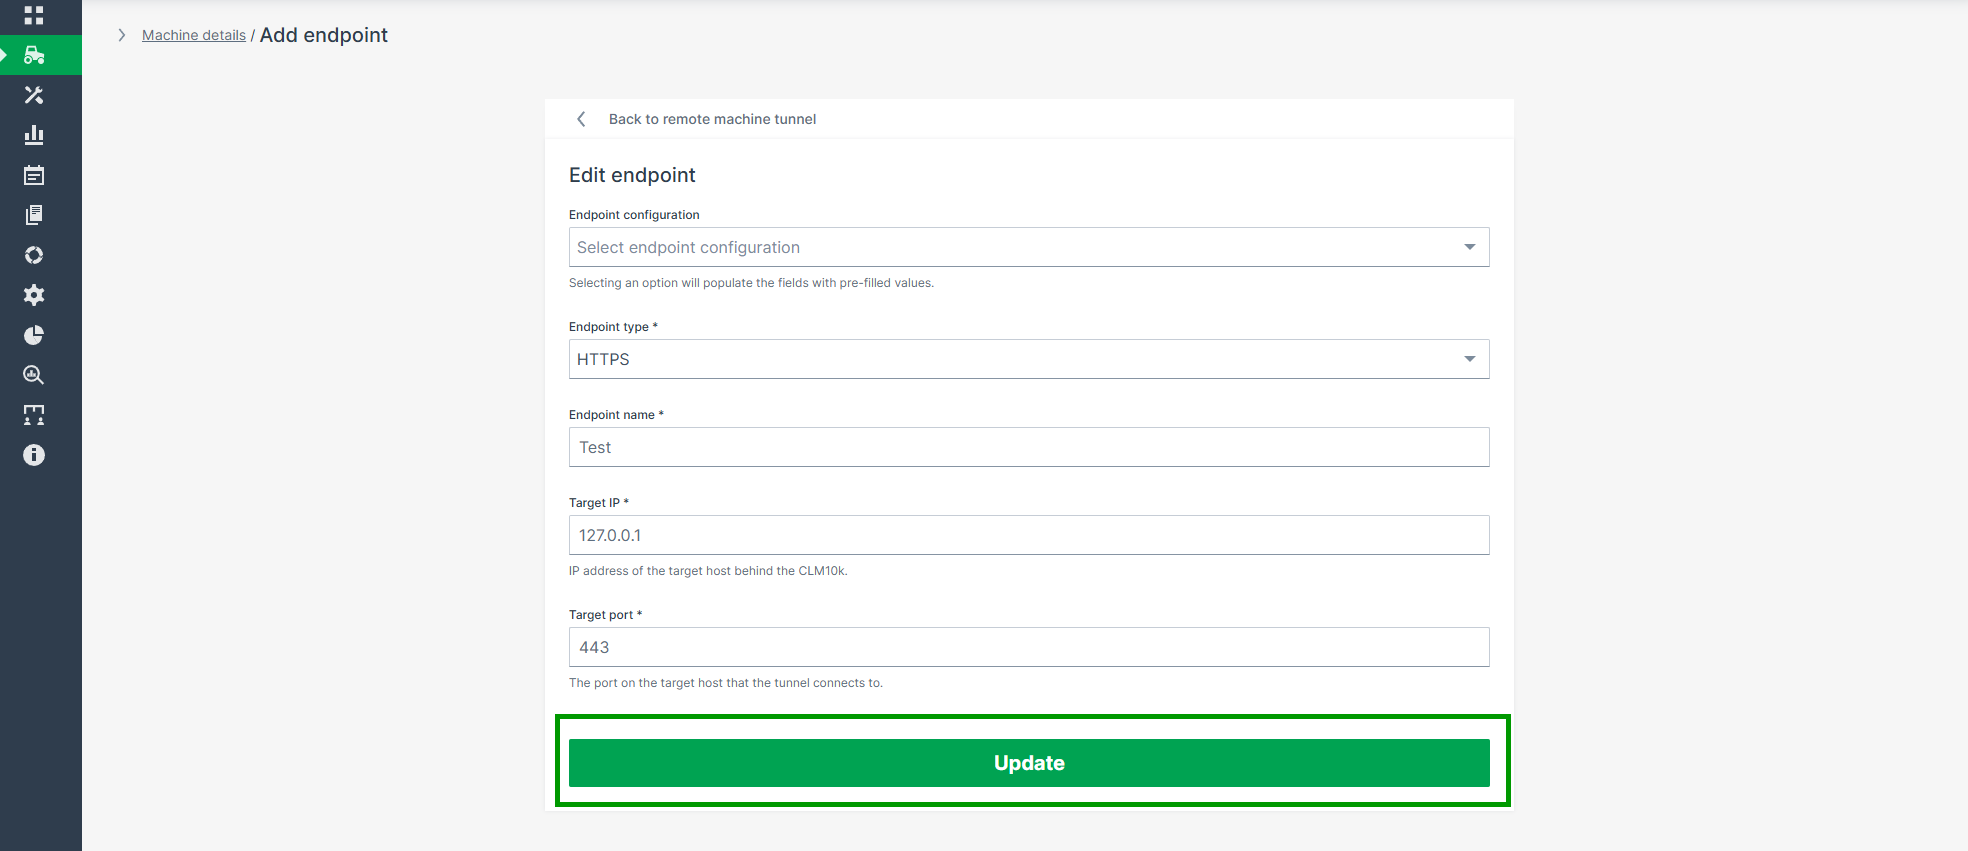
Figure 7: Apply Changes
A confirmation message appears: Endpoint has been updated successfully.
Deleting Endpoints
Endpoints can be deleted only when no tunnel is running.
When a tunnel is active, endpoint management is disabled and the Delete option is not available.
Once a tunnel has been stopped, endpoints can be removed.
To delete an endpoint, proceed as follows:
-
Open the 3-dots menu at the end of the row of an endpoint and choose the Delete option.
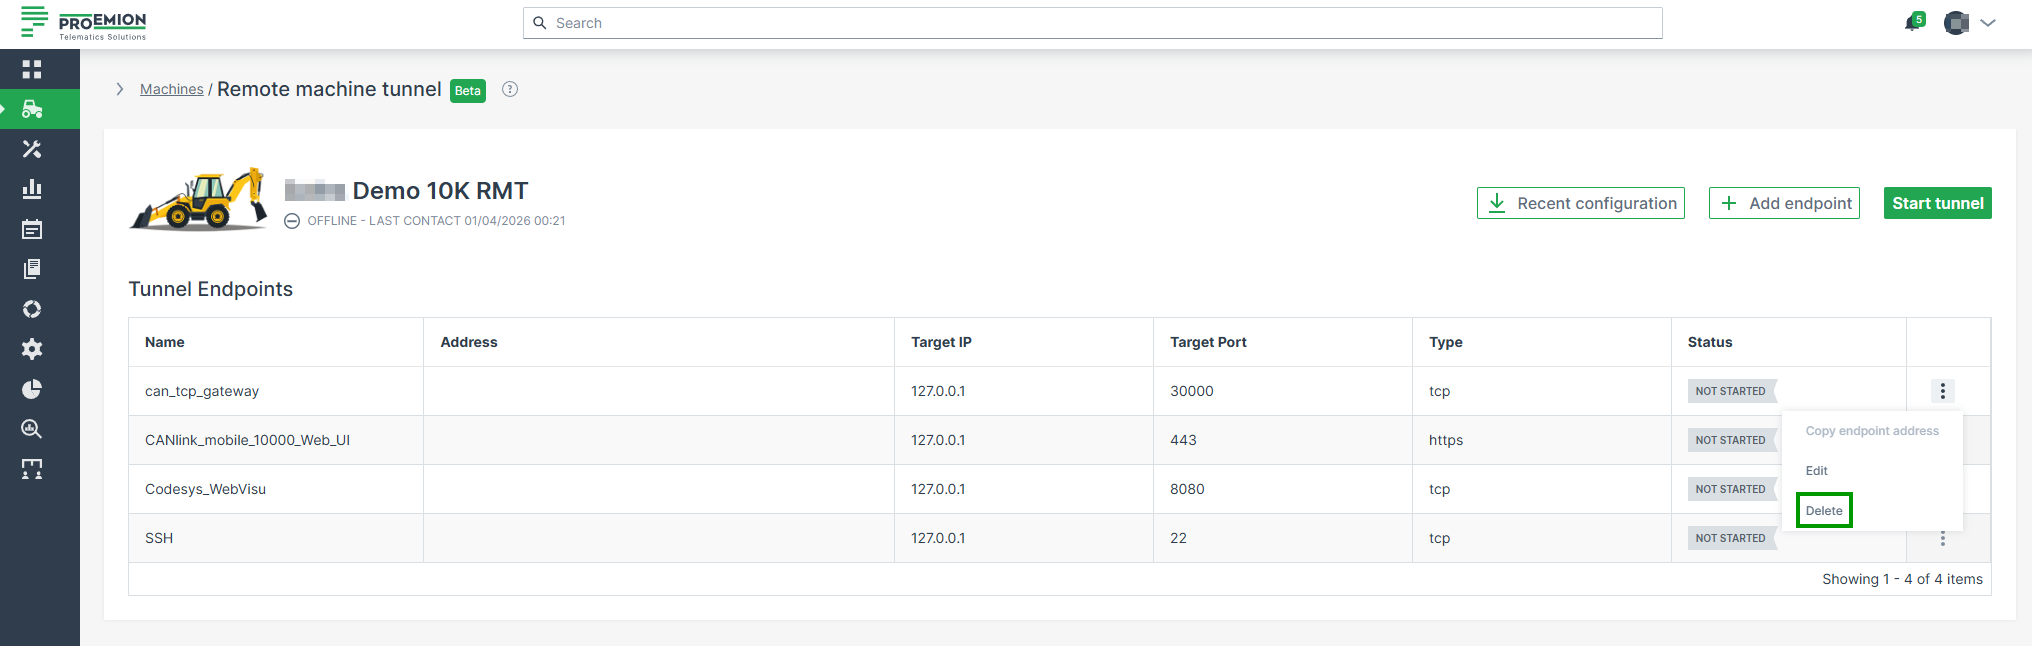
Figure 8: Delete Endpoint -
Confirm the deletion in the dialog that appears.
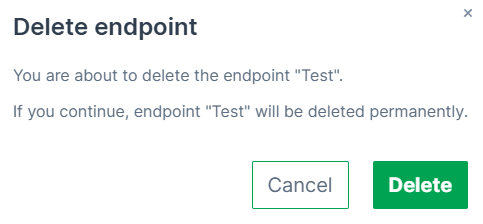
Figure 9: Confirm Deletion
A confirmation message appears: Endpoint has been deleted successfully.
Copy Endpoint Address
For each endpoint, the automatically generated Endpoint Address (Access URL) can be copied for use outside the DataPortal.
This is especially useful when opening HTTPS endpoints directly in a browser or when connecting to TCP-based services through the Remote Machine Tunnel Client.
To copy an endpoint address, proceed as follows:
-
Open the 3-dots menu at the end of the row of an endpoint and click Copy endpoint address.
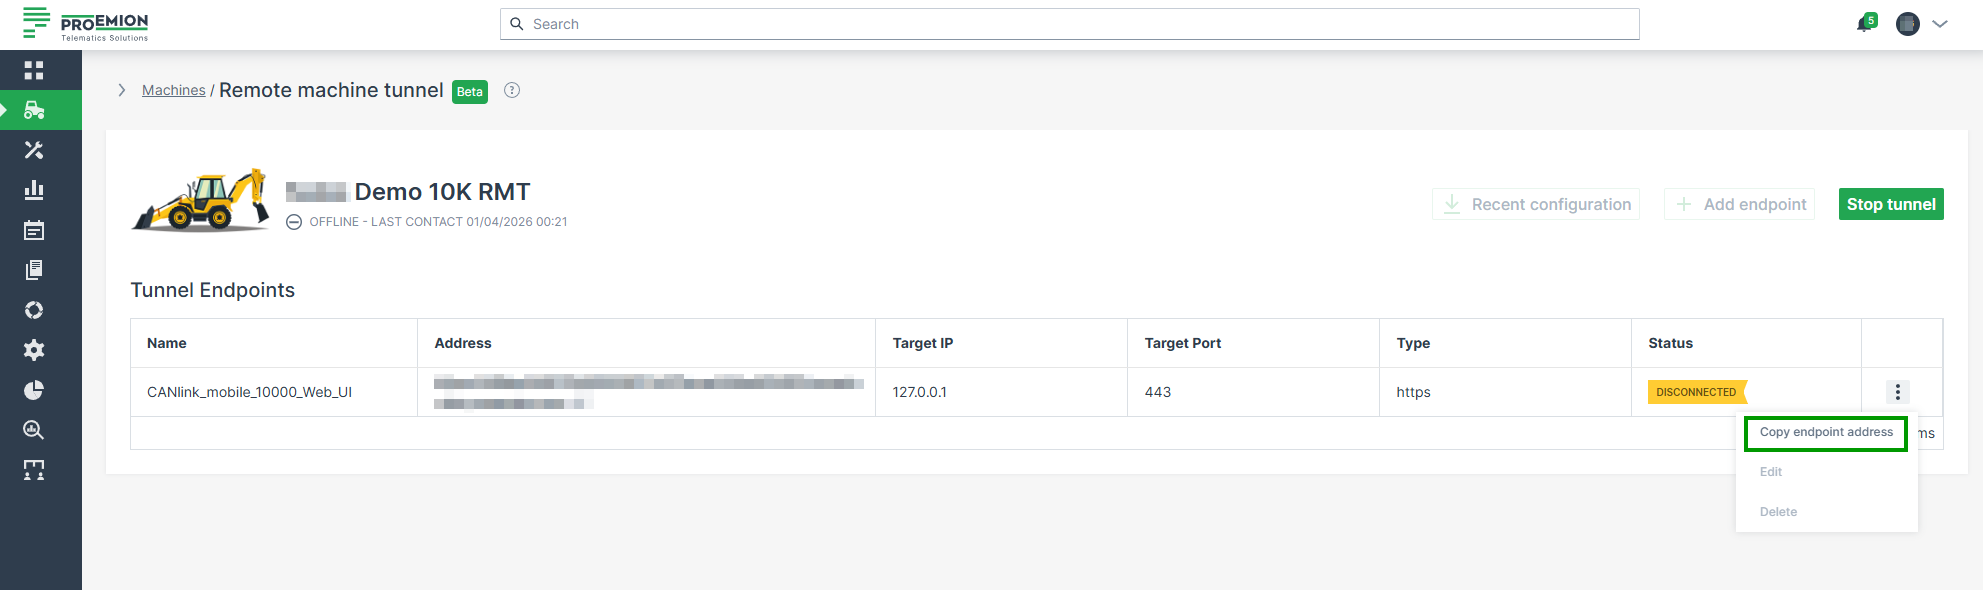
Figure 10: Copy Endpoint Address -
The address is copied to your clipboard.
A confirmation message appears: Endpoint address copied to clipboard.
The copied address can then be pasted into a browser (for HTTPS endpoints) or used as a target for TCP endpoints by the Remote Machine Tunnel Client.
-
The Remote Machine Tunnel Icon in the upper right corner of the machine details page is green. ↩