CANlink® mobile 3600 Quick Start
Overview
The CANlink® mobile 3600 quick start guide explains how to set up the CANlink® mobile 3600 and connect it to the DataPortal using the Launch Kit.
It outlines the typical initial setup process and the main steps required to get started with a "Hello World" type application. Detailed step-by-step instructions are provided in the following manuals, which are referenced throughout this guide:
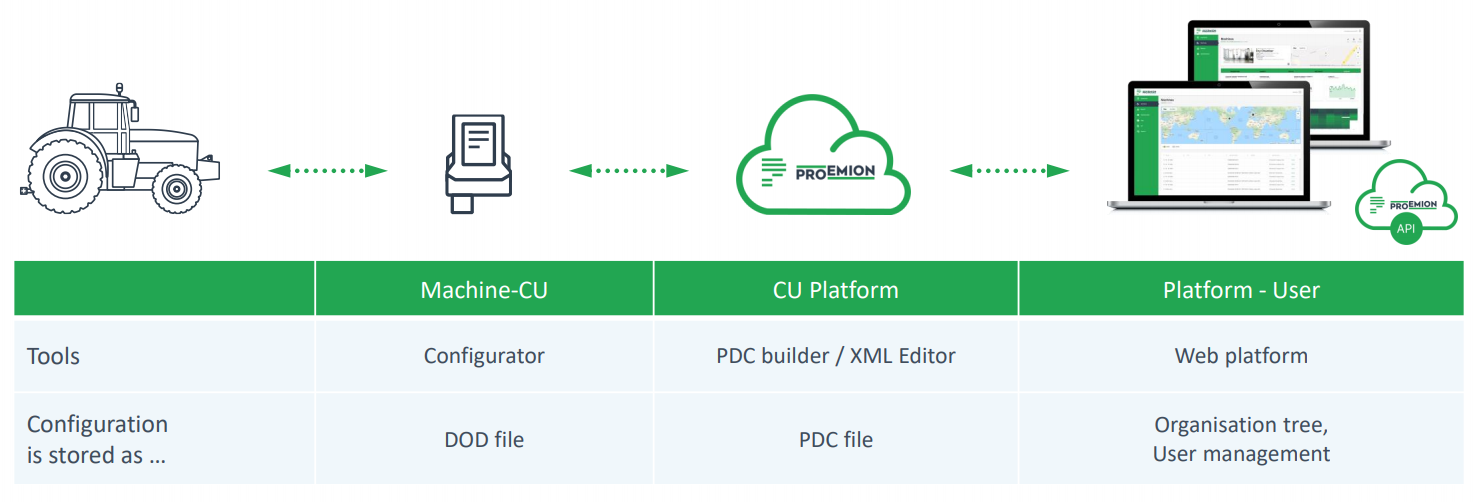
The following figure illustrates the interaction between the machine with its Communication Unit (CU), the CU Cloud (DataPlatform), and the Web interface (DataPortal).
Intended audience
This guide is intended for technicians who are familiar with CAN bus systems, telematics devices, and basic device configuration workflows.
Onboarding best practice
Based on our experience in integrating telematics solutions into machine fleets, we recommend the following approach for the initial start-up:
- Create a laboratory setup using the device and the Launch Kit before installing the device in a machine.
- Perform the initial configuration and testing in this controlled environment.
- For live machine testing, install the device on a machine to which you have access without limitations.
- Before rolling out the solution to the entire fleet, first deploy the setup on a small set of pilot machines to validate the solution.
Prerequisites
- A valid DataPortal account
- A CANlink® mobile 3600 device
- The CANlink® mobile 3600 Launch Kit
- The latest Proemion Configurator software.
- A PC running Windows or Linux
- An active internet connection
Setup overview
- Perform Provisioning and GoLive in the DataPortal.
- Install the Proemion Configurator .
It can be downloaded from the Download Center under:03_Proemion Tools Software > 01_Software > 01_PROEMION Configurator -
Connect the CANlink® mobile 3600 to a PC.
-
Upload the device configuration.
- Perform a functional test.
- Verify the data in the DataPortal.
Provisioning and GoLive
Before uploading a device configuration and performing functional tests, complete the necessary provisioning steps in the DataPortal.
Provisioning makes the device visible in the DataPortal and allows you to assign machine information such as model, name, and identifiers.
GoLive activates the device and authorizes it to connect to the DataPortal and transfer data.
For detailed information, see Provisioning and PDC Management.
Provisioning
Provisioning registers the CANlink® mobile 3600 in the system and assigns it to the correct customer environment.
- Log in to your DataPortal account.
- Navigate to Settings > Administration > Organization Structure > Machines tab.
- Click Provision Machine and fill in the required information.
- Ensure that the appropriate PDC configuration is assigned.
After provisioning, the device is ready for activation.
GoLive
GoLive is the automated activation of Communication Units after Provisioning.
After Provisioning, proceed as follows to activate the CU:
- Enable the Go Live checkbox.
- Select the required Hosting Plan from the dropdown.
- Enter Your internal reference number.
- Click the GO LIVE button.
Connect the device to a PC
Connect the CANlink® mobile 3600 to your PC as shown in the image below.
For detailed information about the required components, see Starter cable and CANlink® mobile 3600 Launch Kit.
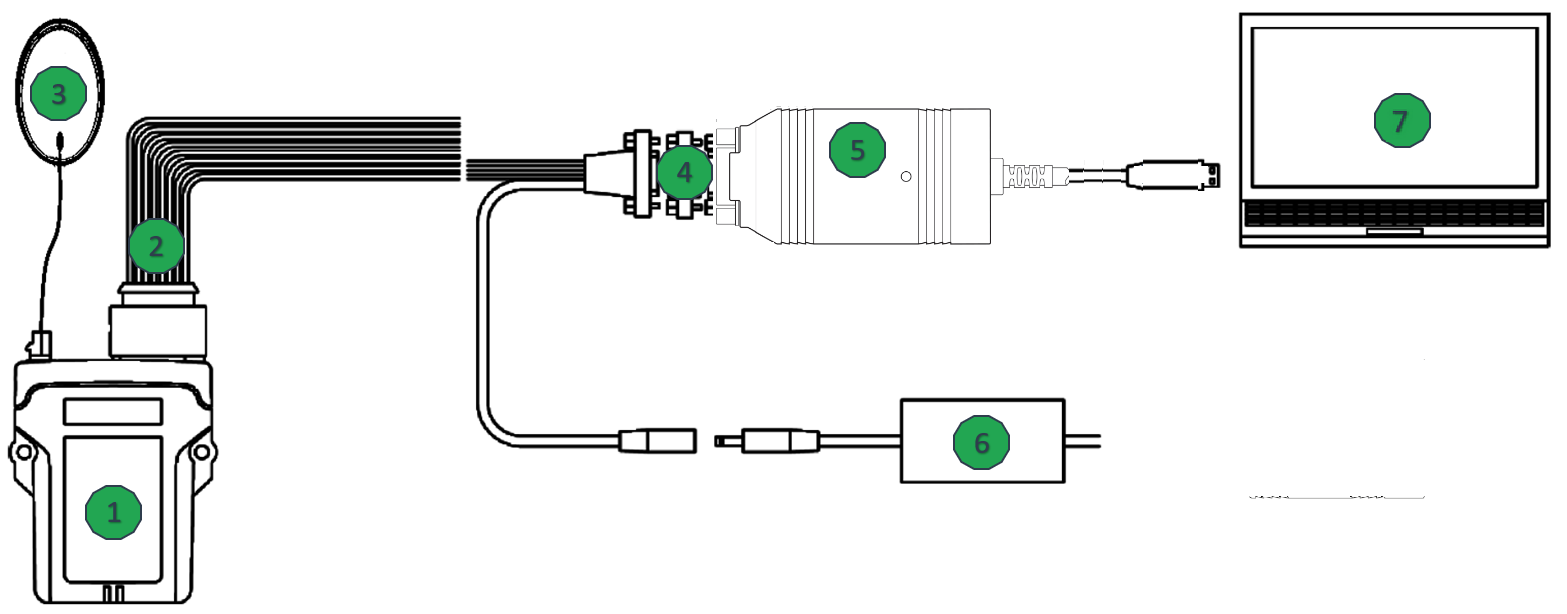
-
CANlink® mobile 3600
-
Starter cable for CANlink® mobile 3600
-
Antenna
-
CAN bus termination resistor 120Ω
-
PCAN-USB - CAN/USB interface
-
Power supply
-
PC
Configure the device
After connecting the CANlink® mobile 3600 to your PC, configure the device using the Proemion Configurator.
This chapter describes the basic steps required for the initial configuration.
For detailed information about creating and installing a device configuration, see Customizing demo configuration and Configuration update.
Open the Proemion Configurator
- Start the Proemion Configurator on your PC.
- Connect to the CANlink® mobile 3600.
- Verify that the device is detected and displayed in the software.
Upload a configuration
To enable signal processing and data transmission, install a device configuration using the Proemion Configurator.
- Download the demo configuration file
clm36xx_Proemion_DemoConfig.DODfrom the Download Center under:01_Proemion_Devices > 01_CANlink mobile 3600 > 02_Configuration > 01_Standard. - Open it in the Proemion Configurator.
- Install the configuration on the device.
Perform a functional test
After uploading the configuration to the CANlink® mobile 3600, perform a functional test to verify that the device receives CAN messages and processes the configured signals.
Use a CAN monitoring tool (for example PCAN View) together with the PCAN-USB interface from the Launch Kit.
For a general overview of potential issues, see troubleshooting. For detailed information, see CANlink® mobile indicator elements.
Send CAN messages
- Start the CAN monitoring software on your PC.
- Connect to the CAN interface.
- Send a few sample CAN messages cyclically that correspond to the signals configured in the Receive CAN Messages section of the installed configuration on the CANlink® mobile 3600.
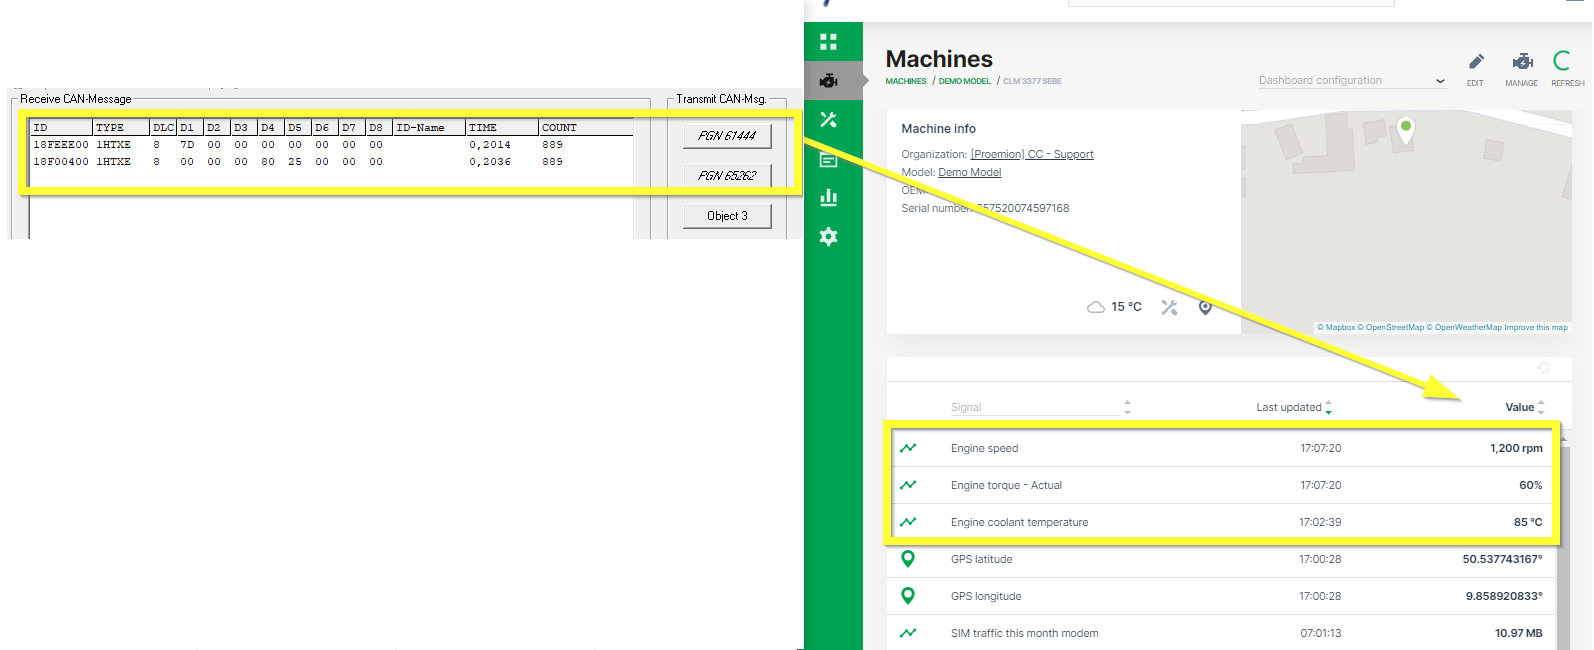
The following CAN messages can be used for test:
| J1939-PGN | SPN | CAN ID | Type | DLC | Data Bytes | Signal |
|---|---|---|---|---|---|---|
| 61444 | 190 | 0x18F00400 | Ext | 8 | 00 00 00 80 25 00 00 00 | 1200 rpm |
| 65262 | 110 | 0x18FEEE00 | Ext | 8 | 7D 00 00 00 00 00 00 00 | 85°C |
If a real machine is available that transmits the configured CAN messages, the CANlink® mobile 3600 can be connected directly to the corresponding CAN bus.
Verify data in DataPortal
In the final step, verify that the device is transmitting data to the DataPortal.
- Log in to your DataPortal account.
- Ensure that the machine is assigned to the correct model and PDC.
- Open the machine details page.
- Verify that the configured signals are displayed.
If the signals are not visible, check the device configuration and CAN communication.
Troubleshooting
This chapter helps you quickly identify and resolve common issues with the CANlink® mobile 3600.
For detailed information, see Troubleshooting.
Device is offline
Symptoms: Device does not appear in DataPortal; LTE LED off.
Possible causes:
- Power supply not connected or faulty
- SIM card not inserted or inactive
- LTE signal too weak
- Device not provisioned in DataPortal
Solutions:
- Check that the power supply is connected and the device LED is on.
- Verify the SIM card is correctly inserted and active.
- Move the device to an area with better LTE coverage or check antenna connection.
- Confirm the device is provisioned in DataPortal.
No CAN data transmitted
Symptoms: CAN messages not visible in monitoring software or DataPortal.
Possible causes:
- CAN bus wiring incorrect
- Termination resistors missing or wrong value
- Baud rate mismatch
- Configuration missing or incorrect
Solutions:
- Verify CAN wiring matches the device documentation.
- Ensure 120Ω termination resistors are installed at both ends of the bus.
- Confirm the CAN baud rate in Proemion Configurator matches the bus.
- Reload or create the correct configuration using the Proemion Configurator.
Incorrect or unexpected signal values
Symptoms: Signal values appear wrong in DataPortal or monitoring tool.
Possible causes:
- Wrong PGN/SPN mapping
- Incorrect scaling or offset
- Byte order mismatch
- PDC mapping incorrect
Solutions:
- Verify PGN/SPN assignment in Proemion Configurator matches your CAN system.
- Check scaling factors and offsets for each signal.
- Confirm byte order (endianness) is correct.
- Reassign signals in the PDC file if necessary and re-provision the device.
Firmware or software issues
Symptoms: Device not responding; configuration cannot be written; unexpected behavior.
Possible causes:
- Outdated firmware
- Outdated Proemion Configurator software
- Compatibility mismatch between device and configuration
Solutions:
- Update device firmware to the latest version.
- Install the latest version of Proemion Configurator.
- Ensure configuration file matches device model and firmware version.
LED indicator guide
Check LEDs first before performing detailed diagnostics.
| LED | Status | Meaning |
|---|---|---|
| Power | Off | Device not powered |
| Power | On | Device powered |
| LTE | Blinking | Searching for network |
| LTE | On | Connected |
| CAN | Off | No CAN activity |
| CAN | Blinking | CAN messages received |
| CAN | On | Active CAN communication |