The SoftGateway Manual describes how to use the tool to receive and send CAN messages via serial interfaces of the CANlink mobile installed on the machine and the appropriate local hardware. |
1. Proemion SoftGateway
The following manual describes the Proemion SoftGateway version 3.x. and its settings.
The Proemion SoftGateway enables a bidirectional CAN communication between local and remote CAN networks.
This can be used to route messages in RealTime via the CAN interfaces of one CAN device to the CAN interface of another CAN device.
That means, you can connect your local-bound applications to a remote machine by using the CAN devices, i.e. the (remote) CANlink mobile device and a (local) gateway device connected to the application.
|
You can use the Proemion SoftGateway driver to implement it on your "Diagnostics & Service Tool". Contact Service and Support. |
1.1. Use Cases
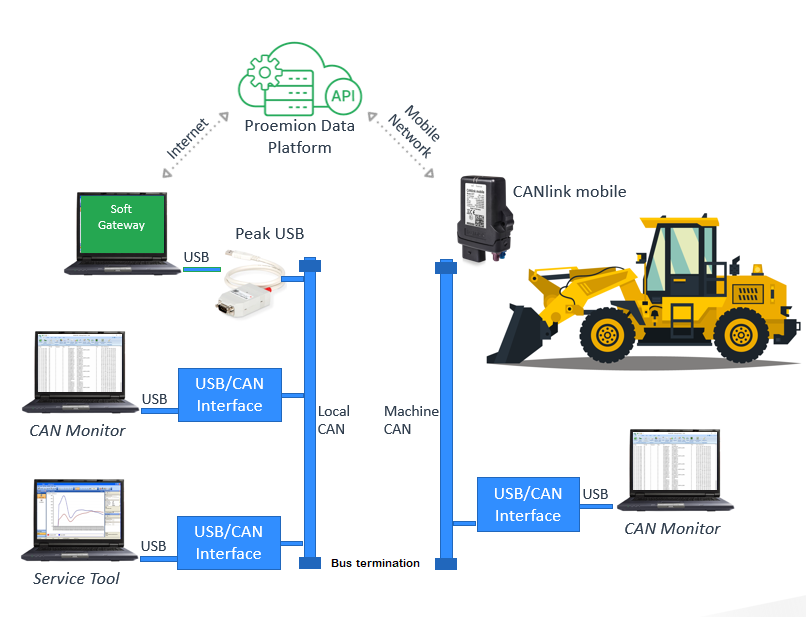
The Proemion SoftGateway can be used for remotely bridging a CANlink mobile with a supported gateway device connected to the local application, e.g. a service tool, without requiring any changes to the existing service tool itself.
This setup can be used for tests during a proof of concept, configuring machine parameters or sending files, which normally require to be on-site.
A Service Technician can observe the received CAN messages of the CANlink mobile devices with Proemion SoftGateway as follows:
The CAN messages received by a CANlink mobile can be sent to a supported gateway device, e.g. "PCAN-USB", over the Internet and transmitted through the CAN interface of the gateway device:

Other use cases might be:
-
Connecting two local CAN networks via Proemion SoftGateway, i.e. using the same gateway devices, e.g. PCAN-USB, read Add and Configure Gateway Devices.
-
Transferring files, read also Transfer Optimization.
1.2. Comparison Proemion SoftGateway v2.x vs v3.x
-
In the v3.x version, predefined filter sets are available so the Proemion SoftGateway tool is ready to use with an initial operation set.
-
You can now manually check for online tool updates via ? > Check for updates….
-
You can report an issue via ? > Report an issue… that will lead you to the Proemion Support page.
There, you can Contact Support for Tech Support.
| Differences between the Remote Service Tool and Proemion SoftGateway: while both tools work with real-time connections to Proemion devices, the Remote Service Tool focuses on CAN bus data visualization typical for service purposes and analysis, while the Proemion SoftGateway enables bidirectional communication and file transfers between CAN networks. |
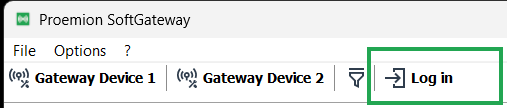
1.2.1. Login
The Proemion DataPlatform login is supported using SSO:
| The SSO login is a preliminary feature. |
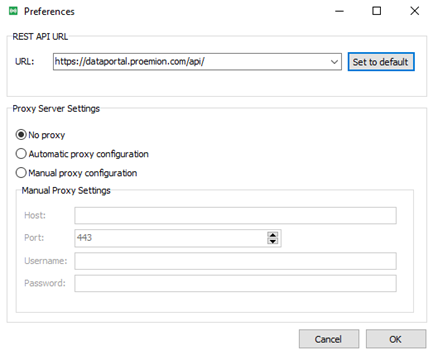
Proemion customers that have implemented a full white label solution must configure their dedicated API address before to execute a correct login:
Go to Options > Preferences and set the dedicated REST API URL:
The login will open the DataPortal in a browser and the user is invited to execute the login.
In case it is required to change the login credentials, it is necessary to clear the browser cache.
When the Proemion SoftGateway is configured and running the Login/Logout has no effect, the login is only required to retrieve the list of machines and select the target of remote connection.
If the target machine is not connected to the DataPortal or a remote reset connection is applied, then the Proemion SoftGateway will show an error.
1.3. Service and Support
The latest versions of the drivers, software, firmware, and documentation are available in our Document Library.
Do you need help or want to report a bug?
Visit Proemion for more information, or raise a ticket at Support.
1.3.1. Firmware Updates and Support
|
2. Setup
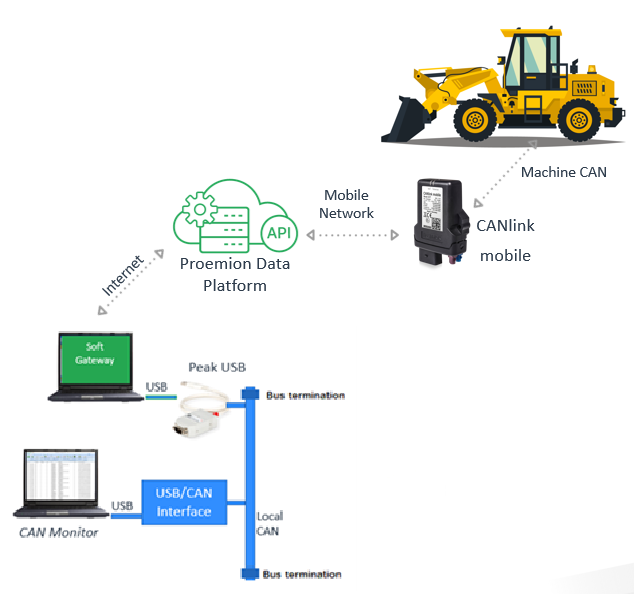
The Proemion SoftGateway and the client application such as a "Diagnostics & Service Tool" can run on the same computer (in case of problems with the cable gateways and applications used, multiple computers can be utilized):
|
A CAN bus termination (2 Resistors with resistance = 120Ω) is needed. Read also Connecting the Device to the PC in the CANlink® mobile 3600 device manual. |
It can be helpful to use separate CAN bus monitoring software, such as PCAN-View (version 5.3.0 or above), to check/compare the receiving messages of the Service Tool and the CANlink mobile:
2.1. Resources
The Proemion SoftGateway tool can be downloaded via the Download Center: Go to Download Center > 03_Proemion Tools Software > 01_Software > 06_PROEMION SoftGatewaySoftGateway Release Notes.
The Release Notes can be found in the same directory: Go to Download Center > 03_Proemion Tools Software > 01_Software > 06_PROEMION SoftGatewaySoftGateway Release Notes.
We recommend using the "PCAN-USB" by PEAK as the CAN-to-USB gateway device.
2.2. Prerequisites
Prerequisites and conditions to use the Proemion SoftGateway:
-
The Proemion SoftGateway requires MS Windows 10 or 11.
-
No special hardware is required.
-
To retrieve the machine list from the Proemion server, the Proemion SoftGateway uses an outgoing TCP connection on port 443 (HTTPS).
-
For a RealTime connection to a CANlink mobile, the Proemion SoftGateway uses WebSockets on port 443 (same as HTTPS).
-
Ensure the firewall does not block these connections, otherwise the setup of the RealTime connection is not possible.
-
Make sure that CANlink mobile device is in Realtime mode, see RealTime Operation.
-
-
Connectivity on you computer can be checked by running the following program Windows (64 bit): connectivity-check.exe downloaded from Network Connectivity.
-
A Proemion DataPlatform account (preferred a REST Client) with RealTime permission must be set up for the CANlink mobile device to be used.
-
The Proemion SoftGateway is based on REST API, so DataPortal users are allowed to use the tool if they have the permission set "Realtime:Admin", see also permission sets in the DataPortal Manual.
-
The REST API URL can be added via Options > Preferences to be selected as a default.
-
It’s not required to set a proxy server:
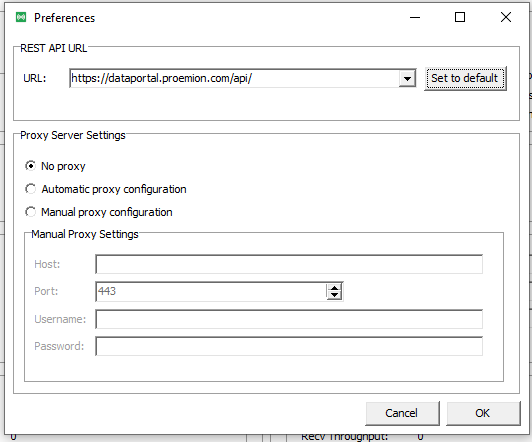 Figure 7. Preferences
-
2.3. Add and Configure Gateway Devices
Add the CAN devices via the Play buttons in the Connection Control to establish a connection between the CAN devices.
Configure their communication settings via the Gateway Settings:
2.3.1. Add Gateway Device 1
-
Add the gateway device, e.g. "PCAN-USB" (see Resources).
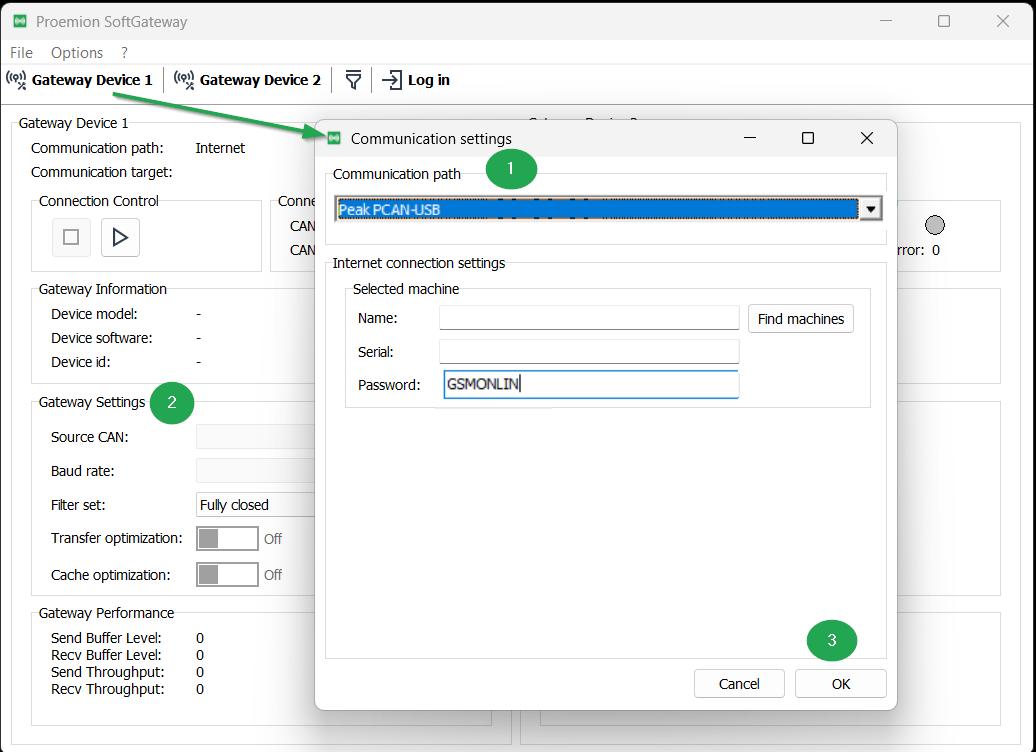 Figure 8. Gateway Device 1 configuration
Enter the password:
GSMONLIN. -
Adapt its settings where necessary, e.g. the Baud rate (set the CAN bit-rate according to your system).
-
Click OK to apply the settings.
The final Gateway Device 1 setup might look as follows: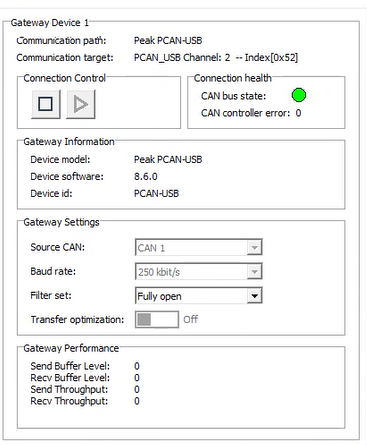 Figure 9. Gateway Device 1
2.3.2. Add the Gateway Device 2
-
Add the CANlink mobile by logging into the DataPlatform.
 Figure 10. Gateway Device 2 configuration
 -
Click Find machines to select the desired device/machine.
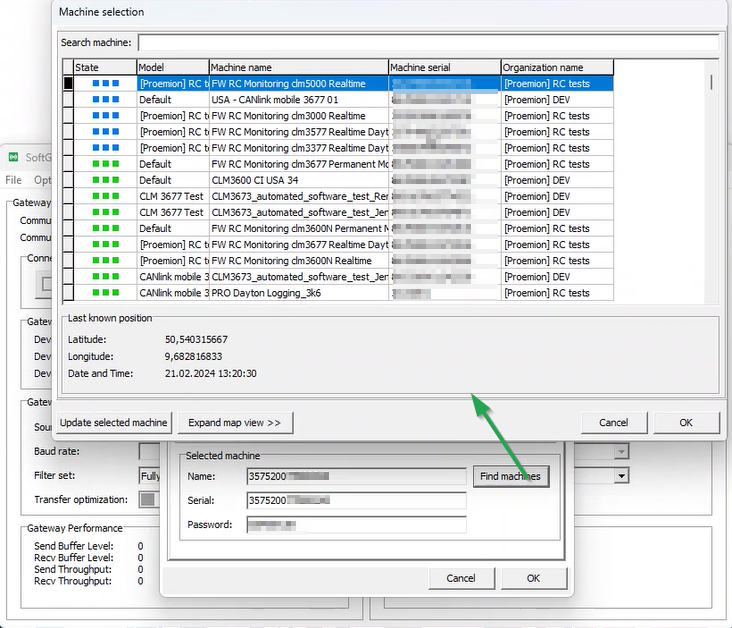 Figure 11. Find machines
 -
Apply/adapt the settings where necessary, e.g. Source CAN (choose the CAN interface, e.g. CAN1 or CAN2).
During an active connection, it’s possible to switch in between the available CAN interface.
Transfer Optimization will be turned on automatically.
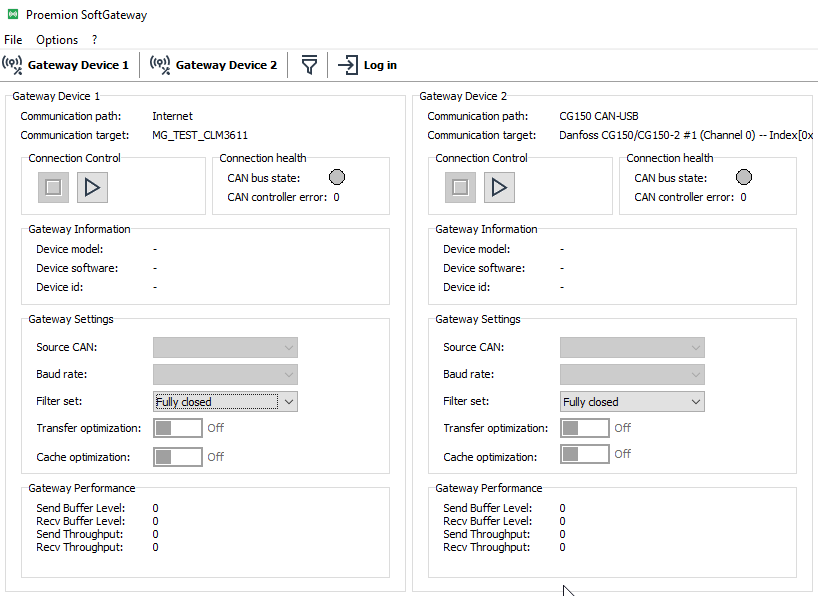
2.3.3. Successful connection
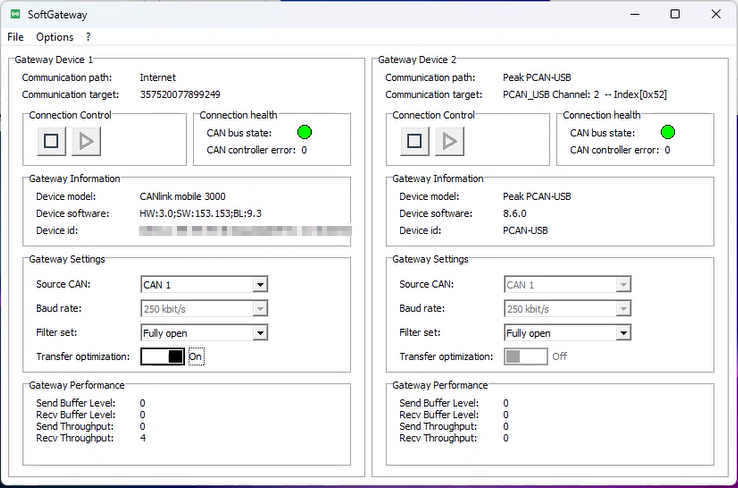
When the connection is successful, the Proemion SoftGateway indicates the connected devices with a green status in the section Connection health.
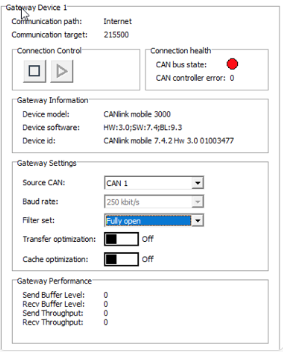
In case of Gateway Devices problems, the CAN Bus state on Connection health section becomes red, meaning that any error is currently present:
You can stop the connection via the Connection Control or terminating the Proemion SoftGateway.
The configuration will be stored and will be proposed at the start of the next session.
2.4. Transfer Optimization
You can transfer/upload files via CAN or protocols such as CANopen from a service tool to the CANlink mobile on the machine.
These files are for example configuration or firmware files.
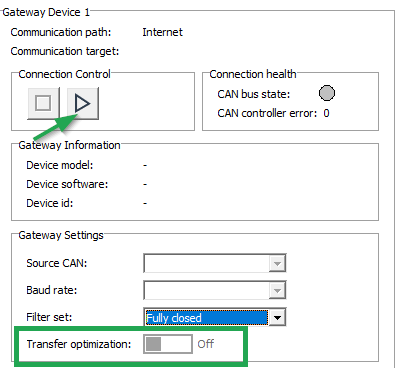
The Transfer optimization slider with no connection in place is set by default to "Off".
|
After starting the Connection Control, the Transfer optimization slider will be automatically set to "ON". In case that the CAN protocol doesn’t include the CANopen segmented data transfer, make sure to change Transfer optimization slider to "Off". |
Consider following information when using the transfer optimization slider:
The Transfer optimization applies only to the CANopen segmented data transfer and requires a CANlink mobile equipped with a firmware version equal or greater than 2.0.0.
3. CAN Filters
In the following, it is described how to set up the CAN filters to limit the CAN communication for transmitted and received 11Bit- or 29Bit messages.
You may set no filter, i.e. leave it "Fully Open", see Predefined Filter Profiles.
You can also import filters.
| During an active connection, it’s possible to switch between CAN filters. |
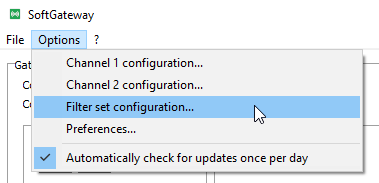
You can open the Filter set configuration via Options > Filter set configuration:
Or by selecting the Filters button:

3.1. Create new Filter Set
-
Open the Filter set configuration via
.
The Filter set configuration window opens: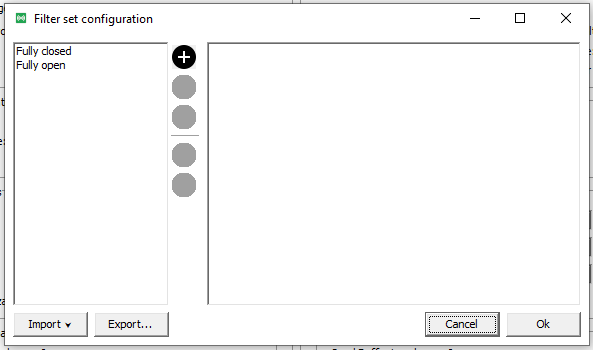 Figure 17. Filter set configuration window
 -
To introduce a new filter set, click
 .
. -
Rename of the filter set by clicking
 .
.
You can remove the filter set by clicking .
.
You can import filters in this window, too. -
Enter the filter set directly in the empty area on the right as shown in the following image.
You can edit the ID, Mask and Suspension time/Timeout in msec in the same area.If an .ids export from the previous version of Proemion SoftGateway is available, you can copy/paste the content. 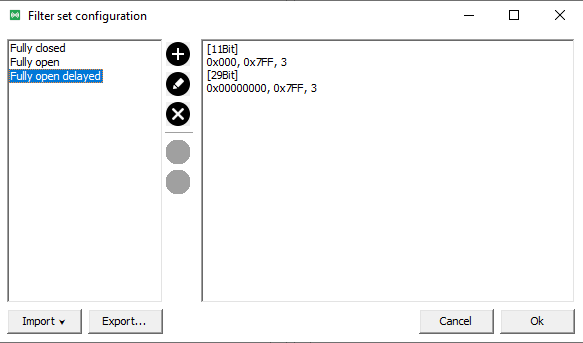 Figure 18. New filter
 -
Click OK to store the filter set.
You can also export the filter set as JSON file.
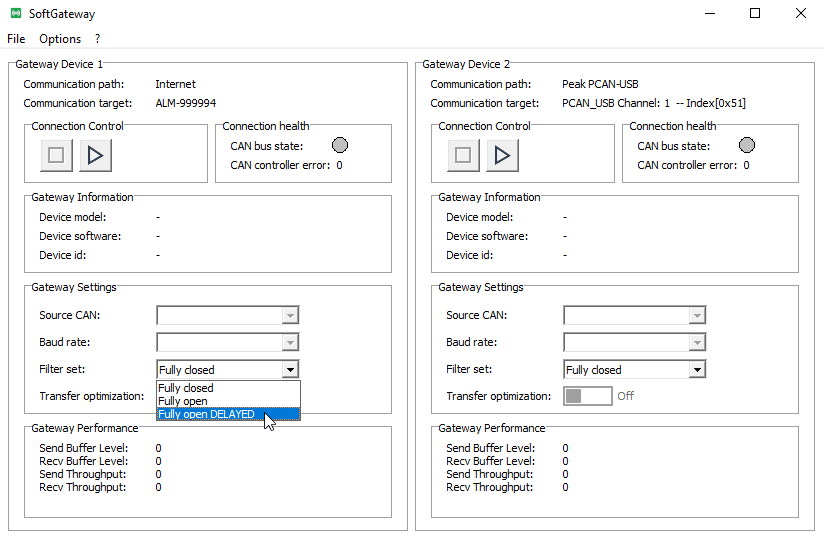
The added filter set becomes immediately available for the selection/usage for the Gateway settings:
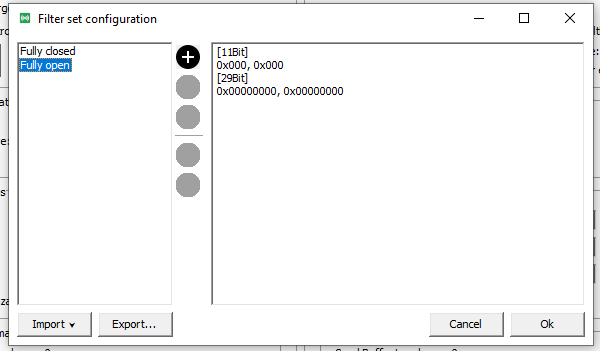
3.2. Predefined Filter Profiles
By default, there are two predefined profiles: Fully closed and Fully open:
By selecting a profile, the content will be displayed in the following format on the empty area on the right:
-
Fully open:
[11Bit] 0x000, 0x000 [29Bit] 0x00000000, 0x00000000 -
Fully Closed: empty/blank
Explanations:
-
[11Bit],[29Bit]: CAN message filters that are applied to CAN Msg ID with
length 11Bit or 29Bit. -
0x0 - 0x00000000: Fixed CAN Message ID in hex or decimal format. -
0x000 - 0x00000000: Optional. CAN Message Filter Mask in hex or decimal format. -
0 - 0: Down-sample Cycle Time.-
If this value is
0, you may also omit/remove it from the filter definition.
-
-
Fully open and Fully closed profiles cannot be overwritten or removed/edited.
4. Optimization Configuration
Optimization configuration is a special feature added to support the management of communication handshake trying to reduce delay between a request and a specific answer.
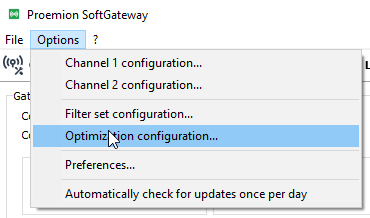
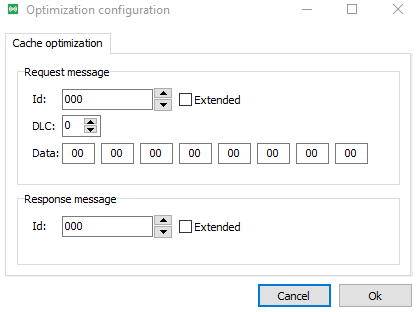
Selecting Options > Optimization configuration opens the following configuration window:
-
Configure a request message.
When this message is received (on either side of the Proemion SoftGateway) it will begin the storage of response messages and send back a stored answer if it exists already. -
Response message:
Is the answer to the request message. The latest data content will be saved in the Proemion SoftGateway and will be returned by the tool.
Example:
Request Sent under optimization:
-
Id: 0x123
-
DLC: 8
-
Data: 11 22 33 44 55 66 77 88
Expected reply:
-
Id: 0x312
When the Proemion SoftGateway sees the request for the first time, it will begin the optimization.
An ECU on the remote side will reply with 0x321.
Now it might take some time for the reply to be received.
When a request is sent for the second time, SoftGateway will immediately answer with the stored response. This should reduce the waiting time significantly.
Version: 11.0.988